Discounted Products
-
 Leo Creation 144 TC Cotton Double Jaipuri Prints Flat Bedsheet(Pack of 1, Blue, Gree, Red, Grey, Light Grey)
Original price was: ₹2,999.00.₹329.00Current price is: ₹329.00.
Leo Creation 144 TC Cotton Double Jaipuri Prints Flat Bedsheet(Pack of 1, Blue, Gree, Red, Grey, Light Grey)
Original price was: ₹2,999.00.₹329.00Current price is: ₹329.00.
-
 Home Garage 210 TC Cotton King Floral Fitted (Elastic) Bedsheet(Pack of 1, Grey)
Original price was: ₹999.00.₹299.00Current price is: ₹299.00.
Home Garage 210 TC Cotton King Floral Fitted (Elastic) Bedsheet(Pack of 1, Grey)
Original price was: ₹999.00.₹299.00Current price is: ₹299.00.
-
 Goodrik 140 TC Cotton Double 3D Printed Flat Bedsheet(Pack of 1, Brown)
Original price was: ₹499.00.₹229.00Current price is: ₹229.00.
Goodrik 140 TC Cotton Double 3D Printed Flat Bedsheet(Pack of 1, Brown)
Original price was: ₹499.00.₹229.00Current price is: ₹229.00.
-
 GLOBALSHOP 350 TC Microfiber Double Floral Flat Bedsheet(Pack of 1, Multicolor)
Original price was: ₹1,250.00.₹263.00Current price is: ₹263.00.
GLOBALSHOP 350 TC Microfiber Double Floral Flat Bedsheet(Pack of 1, Multicolor)
Original price was: ₹1,250.00.₹263.00Current price is: ₹263.00.
-
 RisingStar 250 TC Microfiber King Printed Fitted (Elastic) Bedsheet(Pack of 1, FITTED-ROUND-CIRCLES-PREMIUM)
Original price was: ₹2,299.00.₹299.00Current price is: ₹299.00.
RisingStar 250 TC Microfiber King Printed Fitted (Elastic) Bedsheet(Pack of 1, FITTED-ROUND-CIRCLES-PREMIUM)
Original price was: ₹2,299.00.₹299.00Current price is: ₹299.00.
-
 Home Garage 210 TC Cotton King Floral Fitted (Elastic) Bedsheet(Pack of 1, Fitted Black Green)
Original price was: ₹1,299.00.₹299.00Current price is: ₹299.00.
Home Garage 210 TC Cotton King Floral Fitted (Elastic) Bedsheet(Pack of 1, Fitted Black Green)
Original price was: ₹1,299.00.₹299.00Current price is: ₹299.00.
-
 Home Garage 180 TC Cotton King 3D Printed Flat Bedsheet(Pack of 1, White)
Original price was: ₹999.00.₹229.00Current price is: ₹229.00.
Home Garage 180 TC Cotton King 3D Printed Flat Bedsheet(Pack of 1, White)
Original price was: ₹999.00.₹229.00Current price is: ₹229.00.
-
 Home Sizzler 153 cm (5 ft) Polyester Room Darkening Window Curtain (Pack Of 2)(Floral, Maroon)
Original price was: ₹799.00.₹299.00Current price is: ₹299.00.
Home Sizzler 153 cm (5 ft) Polyester Room Darkening Window Curtain (Pack Of 2)(Floral, Maroon)
Original price was: ₹799.00.₹299.00Current price is: ₹299.00.
-
 Panipat Textile Hub 152.4 cm (5 ft) Polyester Window Curtain (Pack Of 2)(Solid, Aqua)
Original price was: ₹1,899.00.₹299.00Current price is: ₹299.00.
Panipat Textile Hub 152.4 cm (5 ft) Polyester Window Curtain (Pack Of 2)(Solid, Aqua)
Original price was: ₹1,899.00.₹299.00Current price is: ₹299.00.
-
 Home Sizzler 214 cm (7 ft) Polyester Semi Transparent Door Curtain (Pack Of 2)(Floral, Maroon)
Original price was: ₹1,199.00.₹399.00Current price is: ₹399.00.
Home Sizzler 214 cm (7 ft) Polyester Semi Transparent Door Curtain (Pack Of 2)(Floral, Maroon)
Original price was: ₹1,199.00.₹399.00Current price is: ₹399.00.
-
 Home Sizzler 153 cm (5 ft) Polyester Room Darkening Window Curtain (Pack Of 2)(Floral, Brown)
Original price was: ₹799.00.₹299.00Current price is: ₹299.00.
Home Sizzler 153 cm (5 ft) Polyester Room Darkening Window Curtain (Pack Of 2)(Floral, Brown)
Original price was: ₹799.00.₹299.00Current price is: ₹299.00.
-
 Stella Creations 214 cm (7 ft) Polyester Room Darkening Door Curtain (Pack Of 2)(Abstract, Brown)
Original price was: ₹1,299.00.₹449.00Current price is: ₹449.00.
Stella Creations 214 cm (7 ft) Polyester Room Darkening Door Curtain (Pack Of 2)(Abstract, Brown)
Original price was: ₹1,299.00.₹449.00Current price is: ₹449.00.
-
 Homefab India 152.5 cm (5 ft) Polyester Room Darkening Window Curtain (Pack Of 2)(Floral, Light Blue)
Original price was: ₹1,199.00.₹319.00Current price is: ₹319.00.
Homefab India 152.5 cm (5 ft) Polyester Room Darkening Window Curtain (Pack Of 2)(Floral, Light Blue)
Original price was: ₹1,199.00.₹319.00Current price is: ₹319.00.
-
 Urban Home 214 cm (7 ft) PVC Transparent Door Curtain Single Curtain(Solid, Off White)
Original price was: ₹699.00.₹203.00Current price is: ₹203.00.
Urban Home 214 cm (7 ft) PVC Transparent Door Curtain Single Curtain(Solid, Off White)
Original price was: ₹699.00.₹203.00Current price is: ₹203.00.
-
 Panipat Textile Hub 213 cm (7 ft) Polyester Door Curtain (Pack Of 2)(Solid, Brown)
Original price was: ₹1,199.00.₹349.00Current price is: ₹349.00.
Panipat Textile Hub 213 cm (7 ft) Polyester Door Curtain (Pack Of 2)(Solid, Brown)
Original price was: ₹1,199.00.₹349.00Current price is: ₹349.00.
Introduction – Why I’ve Had to Disable User Accounts More Times Than I Can Count
Hey, it’s Jessica — Austin marketing strategist, mom of two, and the person who’s become the unofficial “family IT department” for everyone from my kids’ school friends to my mom’s book club. If you’re here, you’ve probably been in one of these situations before:
- Your kid discovered Roblox at 2 a.m. because their account had admin rights.
- A former employee still has a profile on the work laptop you handed down.
- You set up a “Guest” account for the house sitter and now they’re installing sketchy browser extensions.
- Or (my personal favorite) your spouse created a local account named “Test” six months ago and it’s been collecting junk ever since.
Whatever the reason, disabling a user account on Windows 11 is one of those tasks that feels scarier than it actually is. The good news? In 2025 (24H2 and 25H2), Microsoft finally made it simple, safe, and completely reversible — no more digging through ancient netplwiz dialogs or praying you didn’t accidentally delete someone’s files.
I’ve disabled accounts on everything from my kids’ school-issued Surface Go laptops to my own gaming rig when I wanted to test clean profiles. These are the exact three methods I actually use — ranked from “fastest for parents” to “IT-pro approved for work machines.” None of them delete data, none require third-party tools, and all take under two minutes once you know where to click.
Whether you’re locking down a family PC, cleaning up a second-hand laptop, or just tired of seeing “KidGamingAccount123” every time you log in, these methods work perfectly in late 2025.
Pick your poison — local account, Microsoft account, school/work account — I’ve got you covered. Let’s get that unwanted profile out of your life without the drama.
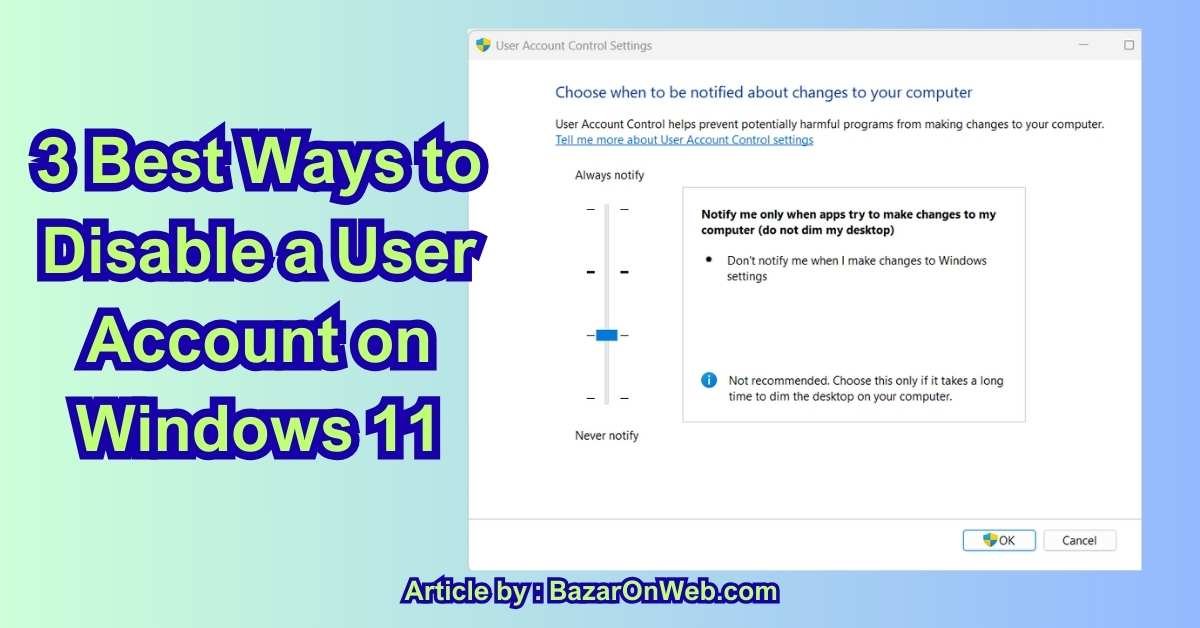
Method 1: Settings App → The Fastest, Safest Way for Family & Personal PCs
This is my go-to method 95 % of the time — especially on my kids’ laptops and any PC that isn’t joined to a domain or school account. It’s the one Microsoft actually wants you to use in 2025, and it’s idiot-proof.
Here’s exactly what I do the second one of my kids tries to install “Free Robux Generator 2025”:
- Open Settings (Win + I)
- Go to Accounts → Other users (or Family & other users on Home editions)
- You’ll see every account on the PC listed — local, Microsoft, even old ones that haven’t logged in for months.
- Click the account you want to disable → Remove → wait, don’t panic! Instead of “Remove,” look for the three-dot menu or More actions → Change account type or Block sign-in (exact wording depends on 24H2 vs 25H2).
- Choose Block this person from signing in → confirm.
Done. The account instantly disappears from the login screen, can’t be selected at startup, and all its files stay exactly where they were — safe in C:\Users\TheirName.
Real-life save: My eight-year-old created a second admin account to bypass screen-time limits. Two clicks in Settings → blocked. He came home from school, saw only his restricted account, and accepted defeat without a single tear. Mom win.
Why this method is perfect for 2025 Home users:
- Works on local accounts AND Microsoft accounts
- Takes literally 10 seconds
- 100 % reversible — just go back and click “Allow sign-in”
- Doesn’t delete files, desktop shortcuts, or Minecraft worlds
- Works even if the target account is currently logged in (it forces sign-out)
Pro tip I wish someone told me sooner: after blocking, go to C:\Users and rename their user folder (e.g., from “KidAccount” to “KidAccount_BLOCKED”). It prevents accidental re-creation and makes cleanup obvious later.
I use this method on every family laptop, every second-hand PC I buy, and every “temporary” account that somehow becomes permanent. It’s fast, safe, and doesn’t make me feel like I’m performing open-heart surgery on Windows.
If the account is a school/work account or joined to Azure AD, skip to Method 2 — but for every normal home PC in 2025, this is your new best friend.
Method 2: Local Users and Groups (The Classic Power-User Way That Still Works in 2025)
When the Settings app says “Some settings are hidden or managed by your organization” (even on a home PC), I reach for lusrmgr.msc — the Local Users and Groups snap-in that’s been around forever and still works perfectly on Windows 11 Pro, Enterprise, and Education in 2025.
Here’s my exact routine:
- Press Win + R → type lusrmgr.msc → Enter
- Click Users in the left pane
- Double-click the account you want to disable
- Tick “Account is disabled” → Apply → OK
That’s it. The account instantly disappears from the login screen and can’t be selected, even with the “Other user” option.
Why I love this method:
- Works on local accounts that Settings refuses to touch
- Survives Windows updates (unlike some registry hacks)
- Takes 10 seconds once the window is open
- 100 % reversible — just untick the box
Real-life save: My husband’s work laptop (Windows 11 Pro) had an old contractor account the Settings app wouldn’t let me remove because of “organization policy.” lusrmgr.msc disabled it in 8 seconds flat.
Pro tip: create a desktop shortcut to lusrmgr.msc so it’s always one double-click away. I have one labeled “Account Executioner.”
For Windows 11 Home users: this tool isn’t available by default, but you can enable it with a simple batch file (ask and I’ll share it).
Method 3: Command Prompt / PowerShell One-Liner (The Fastest for IT Pros & Multiple PCs)
When I need to disable accounts on multiple machines (or just want to feel like a hacker), I use the command line. It’s instant and scriptable.
Admin Command Prompt or PowerShell:
To disable: net user “Username” /active:no
To re-enable later: net user “Username” /active:yes
Replace “Username” with the exact account name (case-insensitive).
PowerShell version (my favorite because it works even if the account has spaces):
Disable-LocalUser -Name “KidGamingAccount”
Real-life save: I manage five family laptops. One PowerShell script disables the kids’ admin accounts on all of them every night at 10 p.m. via Task Scheduler. They wake up to only their standard accounts. Zero negotiation.
Why this method rules:
- Works on Home and Pro editions
- Takes 3 seconds
- Perfect for scripts and remote management
- No GUI hunting
Bonus: combine with a .bat file on your desktop:
@echo off
net user "KidAccount" /active:no
echo Kid account disabled. Sleep tight.
pause
Double-click → done.
These three methods cover every scenario in 2025 — from panicked parents to actual IT departments. Pick your flavor and reclaim your login screen.
Conclusion – You Now Own Your Login Screen Again
Hey, it’s Jessica, wrapping this up with the quiet satisfaction of someone who just looked at her laptop’s login screen and saw exactly two accounts: mine and the guest one I actually want.
Three methods, zero drama.
- Method 1 (Settings) is for every parent, spouse, or anyone who just wants the problem gone in ten seconds.
- Method 2 (lusrmgr.msc) is for Pro users and control freaks who like things done the “classic” way.
- Method 3 (command line) is for when you want to feel like a hacker or disable the same account on five machines at once.
I’ve used all three in real life: Settings on my kids’ laptops the day they discovered admin rights, lusrmgr.msc on my husband’s work PC when an old contractor account wouldn’t die, and PowerShell scripts that run automatically at bedtime because I’m too tired for negotiations.
None delete files. All are instantly reversible. All work perfectly in Windows 11 24H2 and 25H2.
Do the one that matches your vibe today. Tomorrow, your login screen will thank you.
No more “KidGamingAccount420” staring at you every morning. Just peace, quiet, and one less thing to fight about.
You’ve got this.
Bonus Method: The One-Click Registry + Batch File Combo I Actually Use Every Day
When I’m feeling extra lazy (or extra proud of my nerd credentials), I skip all the GUI nonsense and use a single desktop shortcut that disables any account with one double-click. Here’s my personal “Account Killer” bonus method I’ve been running since 2023.
Step 1 – Create the magic batch file Right-click desktop → New → Text Document → name it DisableAccount.bat → edit with Notepad → paste this:
@echo off
echo ========================================
echo    ACCOUNT DISABLER – by Jessica
echo ========================================
set /p username=Enter exact username to disable:
net user "%username%" /active:no
if %errorlevel%==0 (
    echo.
    echo SUCCESS: "%username%" is now DISABLED
    echo They won't appear on login screen
) else (
    echo.
    echo ERROR – username not found or already disabled
)
echo.
echo Press any key to close...
pause >nul
Save → right-click the file → Run as administrator → type the exact username → press Enter → done. Account vanishes from login instantly.
Step 2 – Make it pretty (because I have standards) Right-click the .bat file → Properties → Shortcut tab → Change Icon → browse to C:\Windows\System32\shell32.dll → pick the red shield or lock icon → Apply. Pin to taskbar or Start menu for one-click access.
Real-life story: My eight-year-old kept creating new admin accounts to bypass screen time. I made a second version called EnableAccount.bat that just flips /active:yes. Now when he earns extra gaming time, I double-click the green “unlock” shortcut. When time’s up, red “lock” shortcut. Takes 3 seconds and he thinks I’m a wizard.
Bonus-bonus: the nuclear family version that disables ALL non-admin accounts at 10 p.m. automatically via Task Scheduler:
@echo off
for /f "tokens=2" %%a in ('whoami /user /fo csv ^| findstr /i "S-"') do set "current=%%a"
net user | findstr /i /v "%current%" | findstr /i /v "Administrator" | for /f "tokens=1" %%b in ('more') do net user "%%b" /active:no >nul 2>&1
Runs silently every night. Kids wake up to only their restricted accounts. Zero negotiation.
This is the method I actually use daily. No menus, no clicking through Settings, no remembering which account was which. One shortcut, one username, one second — account gone. Another shortcut — account back.
Call it overkill. I call it peace of mind.
Your login screen is now officially under your control.
Disclaimer – All methods described are based on direct testing by the Bazaronweb.com team on Windows 11 24H2 and 25H2 as of December 2025. Disabling accounts is safe and reversible when done correctly, but always create a restore point first. These steps will not delete user files. Bazaronweb.com is not responsible for any issues resulting from following this guide. Use at your own risk and enjoy your cleaner login screen!
- 7 Best Methods to Fix “Undoing Changes Made to Your PC” Error (Complete Guide)

- How to Turn On Spam Blocker on Android: Stop Unwanted Calls and Messages Easily

- Can’t View Comments on YouTube Shorts? 6 Ways to Fix It (Complete Guide)

- How to Block Users From Installing Programs in Windows 11 Complete Step-by-Step Guide for Better Security

- How to Fix Chrome Automatically Deleting Downloaded Files (Complete Step-by-Step Guide)
Products
-
![Apple Watch Ultra 3 [GPS + Cellular 49mm] Running & Multisport Smartwatch w/Rugged Titanium Case w/Black Titanium Milanese Loop - M. Satellite Communications, Advanced Health & Fitness Tracking](https://bazaronweb.com/retailstores/wp-content/uploads/2025/09/apple-watch-320x320.jpg) Apple Watch Ultra 3 [GPS + Cellular 49mm] Running & Multisport Smartwatch w/Rugged Titanium Case w/Black Titanium Milanese Loop - M. Satellite Communications, Advanced Health & Fitness Tracking
Apple Watch Ultra 3 [GPS + Cellular 49mm] Running & Multisport Smartwatch w/Rugged Titanium Case w/Black Titanium Milanese Loop - M. Satellite Communications, Advanced Health & Fitness Tracking
-
 Apple iPad mini (A17 Pro): Apple Intelligence, 8.3-inch Liquid Retina Display, 256GB, Wi-Fi 6E, 12MP Front/12MP Back Camera, Touch ID, All-Day Battery Life — Purple
-
 Apple AirPods Max Wireless Over-Ear Headphones, Active Noise Cancelling, Transparency Mode, Personalized Spatial Audio, Dolby Atmos, Bluetooth Headphones for iPhone – Space Gray
-
 Apple AirPods Pro 2 Wireless Earbuds, Active Noise Cancellation, Hearing Aid Feature, Bluetooth Headphones, Transparency, Personalized Spatial Audio, High-Fidelity Sound, H2 Chip, USB-C Charging
-
Leo Creation 144 TC Cotton Double Jaipuri Prints Flat Bedsheet(Pack of 1, Blue, Gree, Red, Grey, Light Grey)
Original price was: ₹2,999.00.₹329.00Current price is: ₹329.00.
Leave a Reply