Discounted Products
-
 Leo Creation 144 TC Cotton Double Jaipuri Prints Flat Bedsheet(Pack of 1, Blue, Gree, Red, Grey, Light Grey)
Original price was: ₹2,999.00.₹329.00Current price is: ₹329.00.
Leo Creation 144 TC Cotton Double Jaipuri Prints Flat Bedsheet(Pack of 1, Blue, Gree, Red, Grey, Light Grey)
Original price was: ₹2,999.00.₹329.00Current price is: ₹329.00.
-
 Home Garage 210 TC Cotton King Floral Fitted (Elastic) Bedsheet(Pack of 1, Grey)
Original price was: ₹999.00.₹299.00Current price is: ₹299.00.
Home Garage 210 TC Cotton King Floral Fitted (Elastic) Bedsheet(Pack of 1, Grey)
Original price was: ₹999.00.₹299.00Current price is: ₹299.00.
-
 Goodrik 140 TC Cotton Double 3D Printed Flat Bedsheet(Pack of 1, Brown)
Original price was: ₹499.00.₹229.00Current price is: ₹229.00.
Goodrik 140 TC Cotton Double 3D Printed Flat Bedsheet(Pack of 1, Brown)
Original price was: ₹499.00.₹229.00Current price is: ₹229.00.
-
 GLOBALSHOP 350 TC Microfiber Double Floral Flat Bedsheet(Pack of 1, Multicolor)
Original price was: ₹1,250.00.₹263.00Current price is: ₹263.00.
GLOBALSHOP 350 TC Microfiber Double Floral Flat Bedsheet(Pack of 1, Multicolor)
Original price was: ₹1,250.00.₹263.00Current price is: ₹263.00.
-
 RisingStar 250 TC Microfiber King Printed Fitted (Elastic) Bedsheet(Pack of 1, FITTED-ROUND-CIRCLES-PREMIUM)
Original price was: ₹2,299.00.₹299.00Current price is: ₹299.00.
RisingStar 250 TC Microfiber King Printed Fitted (Elastic) Bedsheet(Pack of 1, FITTED-ROUND-CIRCLES-PREMIUM)
Original price was: ₹2,299.00.₹299.00Current price is: ₹299.00.
-
 Home Garage 210 TC Cotton King Floral Fitted (Elastic) Bedsheet(Pack of 1, Fitted Black Green)
Original price was: ₹1,299.00.₹299.00Current price is: ₹299.00.
Home Garage 210 TC Cotton King Floral Fitted (Elastic) Bedsheet(Pack of 1, Fitted Black Green)
Original price was: ₹1,299.00.₹299.00Current price is: ₹299.00.
-
 Home Garage 180 TC Cotton King 3D Printed Flat Bedsheet(Pack of 1, White)
Original price was: ₹999.00.₹229.00Current price is: ₹229.00.
Home Garage 180 TC Cotton King 3D Printed Flat Bedsheet(Pack of 1, White)
Original price was: ₹999.00.₹229.00Current price is: ₹229.00.
-
 Home Sizzler 153 cm (5 ft) Polyester Room Darkening Window Curtain (Pack Of 2)(Floral, Maroon)
Original price was: ₹799.00.₹299.00Current price is: ₹299.00.
Home Sizzler 153 cm (5 ft) Polyester Room Darkening Window Curtain (Pack Of 2)(Floral, Maroon)
Original price was: ₹799.00.₹299.00Current price is: ₹299.00.
-
 Panipat Textile Hub 152.4 cm (5 ft) Polyester Window Curtain (Pack Of 2)(Solid, Aqua)
Original price was: ₹1,899.00.₹299.00Current price is: ₹299.00.
Panipat Textile Hub 152.4 cm (5 ft) Polyester Window Curtain (Pack Of 2)(Solid, Aqua)
Original price was: ₹1,899.00.₹299.00Current price is: ₹299.00.
-
 Home Sizzler 214 cm (7 ft) Polyester Semi Transparent Door Curtain (Pack Of 2)(Floral, Maroon)
Original price was: ₹1,199.00.₹399.00Current price is: ₹399.00.
Home Sizzler 214 cm (7 ft) Polyester Semi Transparent Door Curtain (Pack Of 2)(Floral, Maroon)
Original price was: ₹1,199.00.₹399.00Current price is: ₹399.00.
-
 Home Sizzler 153 cm (5 ft) Polyester Room Darkening Window Curtain (Pack Of 2)(Floral, Brown)
Original price was: ₹799.00.₹299.00Current price is: ₹299.00.
Home Sizzler 153 cm (5 ft) Polyester Room Darkening Window Curtain (Pack Of 2)(Floral, Brown)
Original price was: ₹799.00.₹299.00Current price is: ₹299.00.
-
 Stella Creations 214 cm (7 ft) Polyester Room Darkening Door Curtain (Pack Of 2)(Abstract, Brown)
Original price was: ₹1,299.00.₹449.00Current price is: ₹449.00.
Stella Creations 214 cm (7 ft) Polyester Room Darkening Door Curtain (Pack Of 2)(Abstract, Brown)
Original price was: ₹1,299.00.₹449.00Current price is: ₹449.00.
-
 Homefab India 152.5 cm (5 ft) Polyester Room Darkening Window Curtain (Pack Of 2)(Floral, Light Blue)
Original price was: ₹1,199.00.₹319.00Current price is: ₹319.00.
Homefab India 152.5 cm (5 ft) Polyester Room Darkening Window Curtain (Pack Of 2)(Floral, Light Blue)
Original price was: ₹1,199.00.₹319.00Current price is: ₹319.00.
-
 Urban Home 214 cm (7 ft) PVC Transparent Door Curtain Single Curtain(Solid, Off White)
Original price was: ₹699.00.₹203.00Current price is: ₹203.00.
Urban Home 214 cm (7 ft) PVC Transparent Door Curtain Single Curtain(Solid, Off White)
Original price was: ₹699.00.₹203.00Current price is: ₹203.00.
-
 Panipat Textile Hub 213 cm (7 ft) Polyester Door Curtain (Pack Of 2)(Solid, Brown)
Original price was: ₹1,199.00.₹349.00Current price is: ₹349.00.
Panipat Textile Hub 213 cm (7 ft) Polyester Door Curtain (Pack Of 2)(Solid, Brown)
Original price was: ₹1,199.00.₹349.00Current price is: ₹349.00.
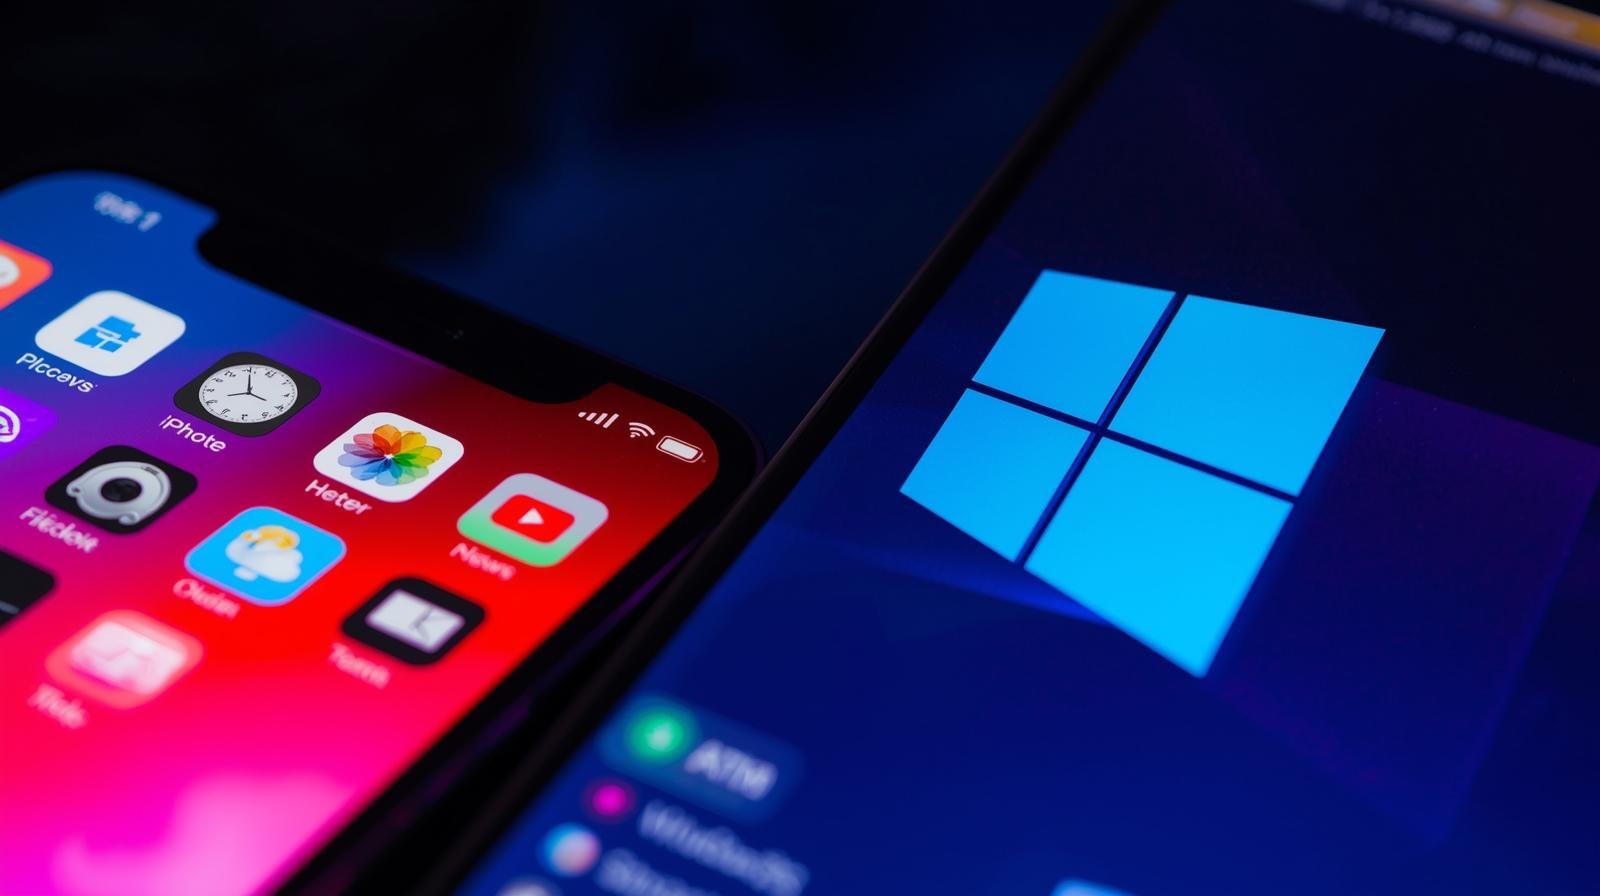
Hey friends! I’m Jessica, and if you’re an iPhone user like me who loves to back up your data regularly but works mostly on a Windows computer, you might’ve wondered — “Where exactly is my iPhone backup stored on Windows?”
Trust me, I’ve been there. A few months ago, when I upgraded my iPhone and wanted to restore everything from my last backup, I couldn’t find the backup folder anywhere on my laptop. It felt like Apple hid it in some secret chamber inside Windows! After a little digging (and a few cups of coffee), I figured it all out. So, today I’m sharing everything you need to know about where iPhone backups are stored in Windows, how to access them safely, and what you should — and shouldn’t — do with them.
Understanding iPhone Backups
Before jumping into the exact file path, let’s first understand what kind of backup you’re dealing with. When you connect your iPhone to a Windows PC via iTunes (or the Apple Devices app if you’re using Windows 11), your system creates a local backup of your device.
This backup includes:
- Messages, call logs, and settings
- App data and home screen layout
- Health data (if encrypted)
- Photos and videos (if not already in iCloud)
It does not include:
- iCloud photos (if you use iCloud Photos)
- Apple Pay data or Face ID/Touch ID settings
- Apps themselves (just their data)
So in short, this backup is a mirror image of your iPhone’s state — perfect for restoring your phone or switching to a new one.
Default Location of iPhone Backups in Windows
Now, let’s get to the real question: Where is the iPhone backup stored on your Windows PC?
For iTunes installed from Apple’s website:
C:\Users\[YourUsername]\AppData\Roaming\Apple Computer\MobileSync\Backup\
For iTunes installed from Microsoft Store (or Apple Devices app on Windows 11):
C:\Users\[YourUsername]\Apple\MobileSync\Backup\
Each folder inside the Backup directory represents a single iPhone backup. The folder names look like long strings of random numbers and letters — those are unique identifiers for each device backup.
How to Access the iPhone Backup Folder
If you’re not used to digging into Windows folders, here’s the simple step-by-step method I use:
- Open File Explorer
Press Windows + E on your keyboard to open File Explorer. - Enable Hidden Items
Go to the View tab → Check Hidden items.
(This step is crucial because the AppData folder is hidden by default.) - Navigate to the Path
Go to:
C:\Users\[YourUsername]\AppData\Roaming\Apple Computer\MobileSync\Backup\ - Open the Folder
Inside, you’ll see one or more folders — each representing an iPhone or iPad backup. - Optional: Right-click and select Properties to check how much space the backup is taking. (Some can be over 5–10 GB depending on what’s stored.)
How to Identify Which Backup Belongs to Which iPhone
If you’ve backed up multiple Apple devices to your PC (say your iPhone and your kid’s iPad), you’ll see several folders with random names. Here’s how to tell which is which:
- Open iTunes → Click Edit > Preferences
- Go to the Devices tab
- You’ll see a list of device names and the date/time of each backup
- Right-click any backup → choose Show in Finder (on Mac) or Show in Explorer (on Windows)
This will open the exact folder where that particular device’s backup is stored.
How to Move iPhone Backups to Another Drive
If your C: drive is filling up fast, you might want to move your backup to another disk or external drive.
Here’s how I did it safely:
- Locate the Backup Folder
Follow the path above and find the Backup folder. - Copy it to Another Drive
For example, paste it intoD:\iPhoneBackup. - Create a Symbolic Link
Now, you’ll “trick” iTunes into thinking your backup still lives in its original location.- Delete (or rename) the old Backup folder.
- Open Command Prompt (as Administrator).
- Type this command (adjust for your username and path):
mklink /J "C:\Users\[YourUsername]\AppData\Roaming\Apple Computer\MobileSync\Backup" "D:\iPhoneBackup" - Press Enter — You’ve now successfully redirected iTunes backups to your D: drive!
Can You Read or Open the Backup Files?
Here’s something important — you can’t directly open or read backup files as they are stored in encrypted or proprietary formats.
The files inside the backup folder are mostly database and system files like .plist, .db, and .mddata. To view the contents in human-readable form, you’ll need third-party tools such as:
- iMazing
- iExplorer
- Dr.Fone – Backup & Restore
- Tenorshare iCareFone
I personally use iMazing because it’s simple and lets me extract specific things like messages or photos without restoring the entire backup.
iTunes Backup vs. iCloud Backup — Key Differences
When I first got my iPhone, I assumed iTunes backups and iCloud backups were identical — but they’re not.
| Feature | iTunes (PC) Backup | iCloud Backup |
|---|---|---|
| Storage | Local PC storage | Cloud storage (5 GB free) |
| Accessibility | Only via that PC | Accessible anywhere |
| Speed | Depends on USB speed | Depends on Wi-Fi |
| Encryption | Optional | Always encrypted |
| Data Safety | Risk if PC crashes | Safer with Apple servers |
So if you’re someone like me who often travels and doesn’t always have your laptop handy, iCloud backups might be more convenient. But for full control and large data, local iTunes backups are still the way to go.
How to Delete Old Backups
Old backups can take up huge space over time. Here’s how you can delete them safely:
- Open iTunes
- Go to Edit > Preferences > Devices
- Select the old backup
- Click Delete Backup
Alternatively, you can manually delete the folder from File Explorer — just make sure you’re not removing the most recent one!
Troubleshooting Tips
Sometimes your iPhone might not back up properly, or you might see errors when restoring. Here’s what I’ve learned works best:
- Ensure you have enough disk space before starting a backup
- Update iTunes or Apple Devices app to the latest version
- Disable antivirus temporarily (some interfere with backup files)
- If you get “iTunes could not back up the iPhone because an error occurred”, try restarting both devices and reconnecting via a new USB cable.
Final Thoughts
So, where is your iPhone backup stored on Windows?
Now you know exactly where to look, how to access it, and even how to move it if you need more space.
As someone who manages both personal and family devices, I can’t stress enough the importance of keeping backups organized — especially before updates or new device setups.
My tip: Set a reminder once every month to back up your iPhone manually to your PC or iCloud. It’s one of those small habits that can save you hours of stress later.
- macOS Tahoe Performance Tweaks: New Features and Hidden Settings That Speed Up Your Mac

- Why Some iPhone Apps May Stop Working After the Latest iOS Update and How to Fix Them: Complete Troubleshooting Guide

- Android 17 Privacy Changes Explained: New Settings Every User Needs to Review for Maximum Protection

- iOS 27 Hidden Features Apple Didn’t Highlight During WWDC: Essential Tips and Tricks You Need to Try Today

- How to Improve Audio Quality on Windows 11: Essential Sound Settings Adjustments and Optimization Guide

Products
-
![Apple Watch Ultra 3 [GPS + Cellular 49mm] Running & Multisport Smartwatch w/Rugged Titanium Case w/Black Titanium Milanese Loop - M. Satellite Communications, Advanced Health & Fitness Tracking](https://bazaronweb.com/retailstores/wp-content/uploads/2025/09/apple-watch-320x320.jpg) Apple Watch Ultra 3 [GPS + Cellular 49mm] Running & Multisport Smartwatch w/Rugged Titanium Case w/Black Titanium Milanese Loop - M. Satellite Communications, Advanced Health & Fitness Tracking
Apple Watch Ultra 3 [GPS + Cellular 49mm] Running & Multisport Smartwatch w/Rugged Titanium Case w/Black Titanium Milanese Loop - M. Satellite Communications, Advanced Health & Fitness Tracking
-
 Apple iPad mini (A17 Pro): Apple Intelligence, 8.3-inch Liquid Retina Display, 256GB, Wi-Fi 6E, 12MP Front/12MP Back Camera, Touch ID, All-Day Battery Life — Purple
-
 Apple AirPods Max Wireless Over-Ear Headphones, Active Noise Cancelling, Transparency Mode, Personalized Spatial Audio, Dolby Atmos, Bluetooth Headphones for iPhone – Space Gray
-
 Apple AirPods Pro 2 Wireless Earbuds, Active Noise Cancellation, Hearing Aid Feature, Bluetooth Headphones, Transparency, Personalized Spatial Audio, High-Fidelity Sound, H2 Chip, USB-C Charging
-
Leo Creation 144 TC Cotton Double Jaipuri Prints Flat Bedsheet(Pack of 1, Blue, Gree, Red, Grey, Light Grey)
Original price was: ₹2,999.00.₹329.00Current price is: ₹329.00.
Leave a Reply