Discounted Products
-
 Leo Creation 144 TC Cotton Double Jaipuri Prints Flat Bedsheet(Pack of 1, Blue, Gree, Red, Grey, Light Grey)
Original price was: ₹2,999.00.₹329.00Current price is: ₹329.00.
Leo Creation 144 TC Cotton Double Jaipuri Prints Flat Bedsheet(Pack of 1, Blue, Gree, Red, Grey, Light Grey)
Original price was: ₹2,999.00.₹329.00Current price is: ₹329.00.
-
 Home Garage 210 TC Cotton King Floral Fitted (Elastic) Bedsheet(Pack of 1, Grey)
Original price was: ₹999.00.₹299.00Current price is: ₹299.00.
Home Garage 210 TC Cotton King Floral Fitted (Elastic) Bedsheet(Pack of 1, Grey)
Original price was: ₹999.00.₹299.00Current price is: ₹299.00.
-
 Goodrik 140 TC Cotton Double 3D Printed Flat Bedsheet(Pack of 1, Brown)
Original price was: ₹499.00.₹229.00Current price is: ₹229.00.
Goodrik 140 TC Cotton Double 3D Printed Flat Bedsheet(Pack of 1, Brown)
Original price was: ₹499.00.₹229.00Current price is: ₹229.00.
-
 GLOBALSHOP 350 TC Microfiber Double Floral Flat Bedsheet(Pack of 1, Multicolor)
Original price was: ₹1,250.00.₹263.00Current price is: ₹263.00.
GLOBALSHOP 350 TC Microfiber Double Floral Flat Bedsheet(Pack of 1, Multicolor)
Original price was: ₹1,250.00.₹263.00Current price is: ₹263.00.
-
 RisingStar 250 TC Microfiber King Printed Fitted (Elastic) Bedsheet(Pack of 1, FITTED-ROUND-CIRCLES-PREMIUM)
Original price was: ₹2,299.00.₹299.00Current price is: ₹299.00.
RisingStar 250 TC Microfiber King Printed Fitted (Elastic) Bedsheet(Pack of 1, FITTED-ROUND-CIRCLES-PREMIUM)
Original price was: ₹2,299.00.₹299.00Current price is: ₹299.00.
-
 Home Garage 210 TC Cotton King Floral Fitted (Elastic) Bedsheet(Pack of 1, Fitted Black Green)
Original price was: ₹1,299.00.₹299.00Current price is: ₹299.00.
Home Garage 210 TC Cotton King Floral Fitted (Elastic) Bedsheet(Pack of 1, Fitted Black Green)
Original price was: ₹1,299.00.₹299.00Current price is: ₹299.00.
-
 Home Garage 180 TC Cotton King 3D Printed Flat Bedsheet(Pack of 1, White)
Original price was: ₹999.00.₹229.00Current price is: ₹229.00.
Home Garage 180 TC Cotton King 3D Printed Flat Bedsheet(Pack of 1, White)
Original price was: ₹999.00.₹229.00Current price is: ₹229.00.
-
 Home Sizzler 153 cm (5 ft) Polyester Room Darkening Window Curtain (Pack Of 2)(Floral, Maroon)
Original price was: ₹799.00.₹299.00Current price is: ₹299.00.
Home Sizzler 153 cm (5 ft) Polyester Room Darkening Window Curtain (Pack Of 2)(Floral, Maroon)
Original price was: ₹799.00.₹299.00Current price is: ₹299.00.
-
 Panipat Textile Hub 152.4 cm (5 ft) Polyester Window Curtain (Pack Of 2)(Solid, Aqua)
Original price was: ₹1,899.00.₹299.00Current price is: ₹299.00.
Panipat Textile Hub 152.4 cm (5 ft) Polyester Window Curtain (Pack Of 2)(Solid, Aqua)
Original price was: ₹1,899.00.₹299.00Current price is: ₹299.00.
-
 Home Sizzler 214 cm (7 ft) Polyester Semi Transparent Door Curtain (Pack Of 2)(Floral, Maroon)
Original price was: ₹1,199.00.₹399.00Current price is: ₹399.00.
Home Sizzler 214 cm (7 ft) Polyester Semi Transparent Door Curtain (Pack Of 2)(Floral, Maroon)
Original price was: ₹1,199.00.₹399.00Current price is: ₹399.00.
-
 Home Sizzler 153 cm (5 ft) Polyester Room Darkening Window Curtain (Pack Of 2)(Floral, Brown)
Original price was: ₹799.00.₹299.00Current price is: ₹299.00.
Home Sizzler 153 cm (5 ft) Polyester Room Darkening Window Curtain (Pack Of 2)(Floral, Brown)
Original price was: ₹799.00.₹299.00Current price is: ₹299.00.
-
 Stella Creations 214 cm (7 ft) Polyester Room Darkening Door Curtain (Pack Of 2)(Abstract, Brown)
Original price was: ₹1,299.00.₹449.00Current price is: ₹449.00.
Stella Creations 214 cm (7 ft) Polyester Room Darkening Door Curtain (Pack Of 2)(Abstract, Brown)
Original price was: ₹1,299.00.₹449.00Current price is: ₹449.00.
-
 Homefab India 152.5 cm (5 ft) Polyester Room Darkening Window Curtain (Pack Of 2)(Floral, Light Blue)
Original price was: ₹1,199.00.₹319.00Current price is: ₹319.00.
Homefab India 152.5 cm (5 ft) Polyester Room Darkening Window Curtain (Pack Of 2)(Floral, Light Blue)
Original price was: ₹1,199.00.₹319.00Current price is: ₹319.00.
-
 Urban Home 214 cm (7 ft) PVC Transparent Door Curtain Single Curtain(Solid, Off White)
Original price was: ₹699.00.₹203.00Current price is: ₹203.00.
Urban Home 214 cm (7 ft) PVC Transparent Door Curtain Single Curtain(Solid, Off White)
Original price was: ₹699.00.₹203.00Current price is: ₹203.00.
-
 Panipat Textile Hub 213 cm (7 ft) Polyester Door Curtain (Pack Of 2)(Solid, Brown)
Original price was: ₹1,199.00.₹349.00Current price is: ₹349.00.
Panipat Textile Hub 213 cm (7 ft) Polyester Door Curtain (Pack Of 2)(Solid, Brown)
Original price was: ₹1,199.00.₹349.00Current price is: ₹349.00.
Introduction
If you’ve ever plugged in a USB device, connected a new monitor, or upgraded a component inside your PC and wondered, “Why isn’t Windows detecting this yet?” — you’re not alone. I’ve been there too. As someone who balances work, family, and tech (sometimes all at once 😅), I’ve learned that Windows doesn’t always instantly recognize new hardware the way we expect it to.
Windows is actually very good at detecting hardware changes, but sometimes it needs a little nudge. Maybe a driver didn’t load properly, a device was connected after startup, or Windows just missed the signal. When that happens, scanning for hardware changes becomes a simple but powerful fix that can save you time, frustration, and unnecessary troubleshooting.
Think of it as telling Windows, “Hey, take another look—something new is here.” This scan forces the system to recheck all connected devices, identify anything new or missing, and attempt to install the correct drivers automatically. The best part? You don’t need to be a tech expert to do it. Most of the time, it takes less than a minute.
In this guide, I’ll walk you through three reliable methods to scan for hardware changes on a Windows PC. Whether you’re using Windows 10 or Windows 11, these steps are safe, beginner-friendly, and don’t require any extra software. We’ll start with the most common and user-friendly option—Device Manager—which is usually all you need.
If you’ve recently added new hardware, fixed a loose connection, or are troubleshooting a device that suddenly stopped working, this guide will help you get things back on track quickly and confidently.
Let’s start with the easiest and most widely used method.
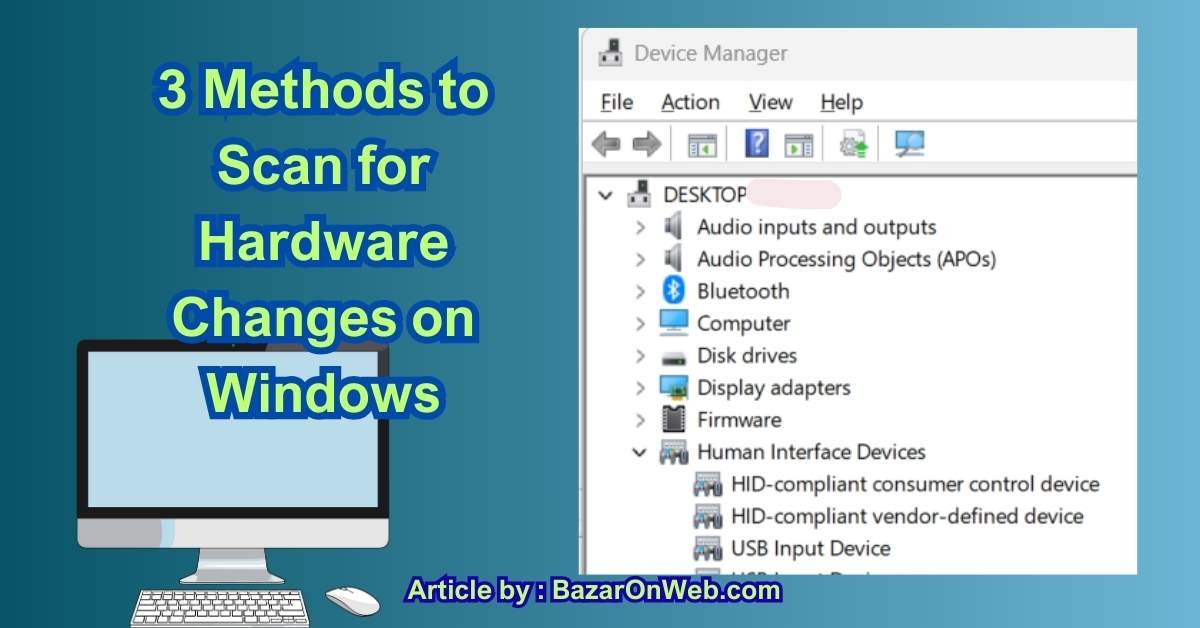
Method 1: Scan for Hardware Changes Using Device Manager (Step-by-Step – ~1000 words)
Device Manager is Windows’ built-in control center for all hardware components—USB devices, keyboards, mice, printers, display adapters, network cards, and more. When something isn’t detected correctly, this is always my first stop.
When should you use this method?
-
You plugged in a new USB device, printer, or external drive
-
A device shows as “not recognized”
-
A driver failed to install properly
-
Hardware worked earlier but suddenly disappeared
-
You upgraded or reconnected internal components (like RAM or a hard drive)
Step 1: Open Device Manager
There are multiple ways to open Device Manager. Use whichever feels easiest:
Option A: Right-click Start Menu
-
Right-click the Start button
-
Click Device Manager
Option B: Search
-
Click the Search icon or Start menu
-
Type Device Manager
-
Press Enter
Once open, you’ll see a list of hardware categories like Display adapters, Network adapters, Universal Serial Bus controllers, and more.
Step 2: Understand What You’re Looking At
Before scanning, it helps to quickly scan the list visually:
-
Look for yellow warning triangles — these indicate driver or device issues
-
Look for Unknown devices
-
Expand categories related to the hardware you added (for example, USB controllers for a flash drive)
This gives you a baseline before forcing Windows to rescan.
Step 3: Scan for Hardware Changes (The Key Step)
Now comes the actual fix.
-
In Device Manager, click on the Action menu at the top
-
Select Scan for hardware changes
Windows will immediately refresh the device list. Behind the scenes, it:
-
Re-checks all connected ports
-
Detects newly attached hardware
-
Attempts to reinstall missing or failed drivers
-
Re-enables devices that were temporarily unavailable
You may notice:
-
New devices appearing
-
Categories refreshing
-
A brief flicker as the list reloads
This is completely normal.
Step 4: Check If Your Hardware Appears
After the scan completes:
-
Look for the device you connected
-
Check if warning icons have disappeared
-
Expand the relevant category to confirm detection
For example:
-
USB drive → Disk drives
-
Printer → Printers
-
Monitor → Display adapters
-
Network device → Network adapters
If the device appears without any warning symbols, Windows has successfully recognized it.
Step 5: If the Device Appears but Still Doesn’t Work
Sometimes the scan detects the hardware, but it still doesn’t function properly. Here’s what I usually do next:
Update the driver
-
Right-click the device
-
Select Update driver
-
Choose Search automatically for drivers
Disable and re-enable
-
Right-click the device
-
Click Disable device
-
Wait a few seconds
-
Right-click again → Enable device
This refreshes the device without restarting your PC.
Step 6: What If the Device Still Doesn’t Show Up?
If scanning doesn’t detect the hardware:
-
Try unplugging and reconnecting the device
-
Switch to a different USB port
-
Restart your computer and scan again
-
Check the cable or power source
-
Test the device on another PC (to rule out hardware failure)
In many cases, the issue isn’t Windows—it’s a loose connection or faulty cable.
Why This Method Works So Well
Device Manager’s scan works because it forces Windows to:
-
Re-enumerate all hardware buses
-
Re-check Plug and Play signals
-
Reload drivers without a full reboot
It’s fast, safe, and doesn’t affect your files or settings—which is why it’s always my first recommendation.
Jessica’s Tip
Any time Windows acts like it’s “ignoring” new hardware, Device Manager → Scan for hardware changes should be your go-to move before trying anything more advanced. It’s simple, effective, and surprisingly powerful.
Method 2: Scan for Hardware Changes Using Command Prompt or PowerShell
If Method 1 felt a little too basic—or if you’re the kind of person who likes having more control—this method is for you. I’ll be honest: the words Command Prompt or PowerShell can sound intimidating at first. I used to avoid them too. But once I realized how effective and precise they are, they quickly became one of my favorite ways to troubleshoot hardware issues on Windows.
This method is especially helpful when:
-
Device Manager doesn’t detect new hardware
-
Drivers partially install or get “stuck”
-
You want a faster, script-based way to rescan devices
-
You’re working remotely or troubleshooting frequently
Don’t worry—I’ll walk you through this step by step, just like I would explain it to a friend.
Why Use Command Line Tools for Hardware Scanning?
Behind the friendly Windows interface, everything is managed by system-level commands. When you use PowerShell or Command Prompt, you’re talking directly to Windows’ hardware management layer. This means:
-
Faster responses
-
More accurate detection
-
Better control over drivers and devices
In some cases, Windows will respond to a command-line rescan even when Device Manager stays silent.
Option A: Using PowerShell (Recommended)
PowerShell is more modern, more powerful, and safer than the old Command Prompt. If your system supports it (Windows 10 & 11 do), this should be your first choice.
Step 1: Open PowerShell as Administrator
-
Click Start
-
Type PowerShell
-
Right-click Windows PowerShell
-
Select Run as administrator
-
Click Yes on the User Account Control prompt
You’ll see a blue or black window with a blinking cursor—this is normal.
Step 2: Scan for Hardware Changes Using pnputil
This is the most important command.
Type the following and press Enter:
What this command does:
-
Forces Windows to scan all hardware buses
-
Detects newly connected or missing devices
-
Triggers Plug and Play detection
-
Initiates driver installation if available
You won’t always see flashy output—but Windows is working in the background.
Jessica’s note:
This command is like tapping Windows on the shoulder and saying, “Please recheck everything. Right now.”
Step 3: Verify Detected Devices
After the scan:
-
Open Device Manager
-
Look for newly added devices
-
Check if missing devices have returned
-
Confirm warning icons are gone
In many cases, the device will appear instantly after this scan.
Step 4: List All Connected Devices (Optional but Useful)
To see what Windows currently recognizes, run:
This shows:
-
All active devices
-
Their status (OK, Error, Disabled)
-
Device class and name
This is incredibly helpful if:
-
A device exists but isn’t visible in Device Manager
-
You’re diagnosing hidden or partially detected hardware
Step 5: Fix a Device by Re-Enabling It via PowerShell
If a device appears but isn’t working:
-
Find the device name using
Get-PnpDevice -
Disable it:
-
Re-enable it:
This forces a soft reset—often more effective than restarting your PC.
Option B: Using Command Prompt (Legacy but Still Useful)
If you prefer the traditional black Command Prompt, this method still works—especially for compatibility troubleshooting.
Step 1: Open Command Prompt as Administrator
-
Click Start
-
Type cmd
-
Right-click Command Prompt
-
Select Run as administrator
Step 2: Trigger Hardware Detection
Type:
Yes—it works in Command Prompt too.
This is the same internal scan Windows uses during boot, but without requiring a restart.
Step 3: When Command Prompt Helps More Than Device Manager
Command-line scans are especially effective when:
-
USB devices disconnect and reconnect rapidly
-
Virtual devices fail to initialize
-
External drives show power but no data
-
Drivers are installed but not activated
In these cases, the command forces Windows to reinitialize the entire device tree.
Advanced Scenario: Automating Hardware Scans
If you troubleshoot often (IT admins, trainers, power users), this method saves serious time.
You can create a simple script:
Run it anytime you connect new hardware—and Windows rescans automatically.
What If This Method Still Doesn’t Work?
If PowerShell and Command Prompt scans don’t detect the hardware:
-
Restart the PC and run the scan again
-
Check BIOS/UEFI to confirm hardware is enabled
-
Update chipset or motherboard drivers
-
Test hardware on another system
-
Replace cable or power source
At this point, the issue is often physical—not software.
Why Method 2 Is So Effective
Compared to Device Manager, this approach:
-
Bypasses UI glitches
-
Communicates directly with Windows services
-
Forces real-time Plug and Play detection
-
Works even when Device Manager fails
It’s my go-to method when I need results fast.
Jessica’s Tip 💻
If you’re comfortable typing a few commands, PowerShell hardware scanning is one of the most underrated Windows troubleshooting tools. It looks technical, but once you use it once or twice, it feels surprisingly empowering.
Method 3: Scan for Hardware Changes by Restarting Windows Hardware Services & BIOS Detection (Deep-Level Fix – ~1200 words)
If Methods 1 and 2 didn’t fully solve the issue, don’t worry—this doesn’t automatically mean your hardware is faulty. Sometimes, the problem isn’t the device itself, but the Windows services or system-level detection process responsible for recognizing hardware in the first place.
This third method goes a layer deeper. It focuses on restarting core Windows services that manage hardware detection and, when needed, confirming that your system firmware (BIOS/UEFI) can actually see the hardware.
This is the method I personally turn to when Windows should detect something—but clearly isn’t cooperating.
When Should You Use Method 3?
Use this method if:
-
The device doesn’t appear in Device Manager at all
-
Command Prompt or PowerShell scans return no results
-
Hardware worked earlier but vanished after an update
-
USB ports have power but don’t recognize devices
-
Internal hardware (SSD, RAM, Wi-Fi card) isn’t detected
Part A: Restart Windows Hardware Detection Services
Windows relies on background services to detect and manage hardware. If one of these services freezes or fails silently, Windows simply stops “listening” for new devices.
Step 1: Open Windows Services
-
Press Windows + R
-
Type
services.msc -
Press Enter
You’ll see a list of all active Windows services.
Step 2: Restart the Plug and Play Service
Scroll down and locate Plug and Play.
This service is critical—it manages:
-
Device discovery
-
Driver loading
-
Hardware state changes
Now:
-
Right-click Plug and Play
-
Click Restart
⚠️ If “Restart” is greyed out:
-
Click Stop
-
Wait 5–10 seconds
-
Click Start
This forces Windows to refresh its entire hardware detection pipeline.
Step 3: Restart Related Services (Highly Recommended)
Restart these services one by one:
-
Windows Management Instrumentation (WMI)
-
Device Setup Manager
-
Shell Hardware Detection
Each of these contributes to how Windows identifies, configures, and displays devices.
Jessica’s tip:
After restarting these services, wait about 30 seconds before checking Device Manager. Windows needs a moment to rebuild its hardware map.
Step 4: Scan Again Using Device Manager
Now repeat what you did in Method 1:
-
Open Device Manager
-
Click Action
-
Select Scan for hardware changes
At this point, many “invisible” devices suddenly reappear.
Part B: Force Hardware Re-Detection via BIOS / UEFI
If Windows services are working but the hardware still isn’t detected, it’s time to check below the operating system.
This step helps answer one crucial question:
Can the computer even see this hardware?
Step 1: Enter BIOS / UEFI
-
Restart your PC
-
During startup, repeatedly press one of these keys (depends on manufacturer):
-
F2
-
Delete
-
Esc
-
F10
-
You’ll enter the BIOS/UEFI setup screen.
Step 2: Check Hardware Visibility
Inside BIOS/UEFI, look for sections like:
-
Storage / Boot Devices
-
Advanced Settings
-
USB Configuration
-
Integrated Peripherals
Confirm whether:
-
Your hard drive / SSD is listed
-
USB ports are enabled
-
Network or Wi-Fi devices are visible
If the hardware does not appear here, Windows cannot detect it—no matter what you do inside the OS.
Step 3: Enable Disabled Hardware (Common Fix)
Sometimes hardware is disabled accidentally:
-
USB ports set to “Disabled”
-
SATA controller turned off
-
Network adapter disabled
Enable the hardware, then:
-
Save changes
-
Exit BIOS
-
Let Windows boot normally
Windows will often auto-detect the hardware on startup.
Step 4: Reset BIOS Settings (Optional but Effective)
If detection issues persist:
-
Look for Load Default Settings or Optimized Defaults
-
Apply it
-
Save and reboot
This clears misconfigurations that block hardware detection.
Why Method 3 Works When Others Fail
This approach works because it:
-
Restarts Windows’ core detection engine
-
Fixes silent service-level failures
-
Confirms hardware availability at firmware level
-
Separates software issues from physical problems
It’s the final checkpoint before concluding there’s a genuine hardware fault.
Conclusion: Which Method Should You Use?
Scanning for hardware changes in Windows doesn’t have to be complicated—but knowing which method to use makes all the difference.
-
Method 1 (Device Manager) is perfect for quick fixes and everyday use
-
Method 2 (PowerShell / Command Prompt) offers deeper, faster control
-
Method 3 (Services & BIOS) solves stubborn, system-level detection issues
Most problems are resolved with Method 1 or 2. Method 3 is your safety net when Windows feels completely blind to new hardware.
Jessica’s Final Thought 🌟
Technology doesn’t always break dramatically—sometimes it just stops listening. When that happens, these methods help Windows pay attention again without panic, stress, or unnecessary repairs.
Disclaimer
This article is for educational and informational purposes only. Steps involving system services or BIOS/UEFI settings should be performed carefully. The author is not responsible for data loss or hardware issues resulting from improper configuration changes.
- How to Fix Internet Problems with a New SSD Complete Troubleshooting Guide for Stable Connectivity

- 5 Best Ways to Fix Windows 11 Slow Startup

- How to Enable or Disable Reserved Storage on Windows 11: Complete Guide to Managing System Storage Space Efficiently

- How To Block Certain Websites In Google Chrome Browser: A Complete Guide For Better Security And Productivity

- How to Enable or Disable WiFi Calling on iPhone: A Complete Guide for Better Call Quality and Connectivity

Products
-
![Apple Watch Ultra 3 [GPS + Cellular 49mm] Running & Multisport Smartwatch w/Rugged Titanium Case w/Black Titanium Milanese Loop - M. Satellite Communications, Advanced Health & Fitness Tracking](https://bazaronweb.com/retailstores/wp-content/uploads/2025/09/apple-watch-320x320.jpg) Apple Watch Ultra 3 [GPS + Cellular 49mm] Running & Multisport Smartwatch w/Rugged Titanium Case w/Black Titanium Milanese Loop - M. Satellite Communications, Advanced Health & Fitness Tracking
Apple Watch Ultra 3 [GPS + Cellular 49mm] Running & Multisport Smartwatch w/Rugged Titanium Case w/Black Titanium Milanese Loop - M. Satellite Communications, Advanced Health & Fitness Tracking
-
 Apple iPad mini (A17 Pro): Apple Intelligence, 8.3-inch Liquid Retina Display, 256GB, Wi-Fi 6E, 12MP Front/12MP Back Camera, Touch ID, All-Day Battery Life — Purple
-
 Apple AirPods Max Wireless Over-Ear Headphones, Active Noise Cancelling, Transparency Mode, Personalized Spatial Audio, Dolby Atmos, Bluetooth Headphones for iPhone – Space Gray
-
 Apple AirPods Pro 2 Wireless Earbuds, Active Noise Cancellation, Hearing Aid Feature, Bluetooth Headphones, Transparency, Personalized Spatial Audio, High-Fidelity Sound, H2 Chip, USB-C Charging
-
Leo Creation 144 TC Cotton Double Jaipuri Prints Flat Bedsheet(Pack of 1, Blue, Gree, Red, Grey, Light Grey)
Original price was: ₹2,999.00.₹329.00Current price is: ₹329.00.
Leave a Reply