Discounted Products
-
 Leo Creation 144 TC Cotton Double Jaipuri Prints Flat Bedsheet(Pack of 1, Blue, Gree, Red, Grey, Light Grey)
Original price was: ₹2,999.00.₹329.00Current price is: ₹329.00.
Leo Creation 144 TC Cotton Double Jaipuri Prints Flat Bedsheet(Pack of 1, Blue, Gree, Red, Grey, Light Grey)
Original price was: ₹2,999.00.₹329.00Current price is: ₹329.00.
-
 Home Garage 210 TC Cotton King Floral Fitted (Elastic) Bedsheet(Pack of 1, Grey)
Original price was: ₹999.00.₹299.00Current price is: ₹299.00.
Home Garage 210 TC Cotton King Floral Fitted (Elastic) Bedsheet(Pack of 1, Grey)
Original price was: ₹999.00.₹299.00Current price is: ₹299.00.
-
 Goodrik 140 TC Cotton Double 3D Printed Flat Bedsheet(Pack of 1, Brown)
Original price was: ₹499.00.₹229.00Current price is: ₹229.00.
Goodrik 140 TC Cotton Double 3D Printed Flat Bedsheet(Pack of 1, Brown)
Original price was: ₹499.00.₹229.00Current price is: ₹229.00.
-
 GLOBALSHOP 350 TC Microfiber Double Floral Flat Bedsheet(Pack of 1, Multicolor)
Original price was: ₹1,250.00.₹263.00Current price is: ₹263.00.
GLOBALSHOP 350 TC Microfiber Double Floral Flat Bedsheet(Pack of 1, Multicolor)
Original price was: ₹1,250.00.₹263.00Current price is: ₹263.00.
-
 RisingStar 250 TC Microfiber King Printed Fitted (Elastic) Bedsheet(Pack of 1, FITTED-ROUND-CIRCLES-PREMIUM)
Original price was: ₹2,299.00.₹299.00Current price is: ₹299.00.
RisingStar 250 TC Microfiber King Printed Fitted (Elastic) Bedsheet(Pack of 1, FITTED-ROUND-CIRCLES-PREMIUM)
Original price was: ₹2,299.00.₹299.00Current price is: ₹299.00.
-
 Home Garage 210 TC Cotton King Floral Fitted (Elastic) Bedsheet(Pack of 1, Fitted Black Green)
Original price was: ₹1,299.00.₹299.00Current price is: ₹299.00.
Home Garage 210 TC Cotton King Floral Fitted (Elastic) Bedsheet(Pack of 1, Fitted Black Green)
Original price was: ₹1,299.00.₹299.00Current price is: ₹299.00.
-
 Home Garage 180 TC Cotton King 3D Printed Flat Bedsheet(Pack of 1, White)
Original price was: ₹999.00.₹229.00Current price is: ₹229.00.
Home Garage 180 TC Cotton King 3D Printed Flat Bedsheet(Pack of 1, White)
Original price was: ₹999.00.₹229.00Current price is: ₹229.00.
-
 Home Sizzler 153 cm (5 ft) Polyester Room Darkening Window Curtain (Pack Of 2)(Floral, Maroon)
Original price was: ₹799.00.₹299.00Current price is: ₹299.00.
Home Sizzler 153 cm (5 ft) Polyester Room Darkening Window Curtain (Pack Of 2)(Floral, Maroon)
Original price was: ₹799.00.₹299.00Current price is: ₹299.00.
-
 Panipat Textile Hub 152.4 cm (5 ft) Polyester Window Curtain (Pack Of 2)(Solid, Aqua)
Original price was: ₹1,899.00.₹299.00Current price is: ₹299.00.
Panipat Textile Hub 152.4 cm (5 ft) Polyester Window Curtain (Pack Of 2)(Solid, Aqua)
Original price was: ₹1,899.00.₹299.00Current price is: ₹299.00.
-
 Home Sizzler 214 cm (7 ft) Polyester Semi Transparent Door Curtain (Pack Of 2)(Floral, Maroon)
Original price was: ₹1,199.00.₹399.00Current price is: ₹399.00.
Home Sizzler 214 cm (7 ft) Polyester Semi Transparent Door Curtain (Pack Of 2)(Floral, Maroon)
Original price was: ₹1,199.00.₹399.00Current price is: ₹399.00.
-
 Home Sizzler 153 cm (5 ft) Polyester Room Darkening Window Curtain (Pack Of 2)(Floral, Brown)
Original price was: ₹799.00.₹299.00Current price is: ₹299.00.
Home Sizzler 153 cm (5 ft) Polyester Room Darkening Window Curtain (Pack Of 2)(Floral, Brown)
Original price was: ₹799.00.₹299.00Current price is: ₹299.00.
-
 Stella Creations 214 cm (7 ft) Polyester Room Darkening Door Curtain (Pack Of 2)(Abstract, Brown)
Original price was: ₹1,299.00.₹449.00Current price is: ₹449.00.
Stella Creations 214 cm (7 ft) Polyester Room Darkening Door Curtain (Pack Of 2)(Abstract, Brown)
Original price was: ₹1,299.00.₹449.00Current price is: ₹449.00.
-
 Homefab India 152.5 cm (5 ft) Polyester Room Darkening Window Curtain (Pack Of 2)(Floral, Light Blue)
Original price was: ₹1,199.00.₹319.00Current price is: ₹319.00.
Homefab India 152.5 cm (5 ft) Polyester Room Darkening Window Curtain (Pack Of 2)(Floral, Light Blue)
Original price was: ₹1,199.00.₹319.00Current price is: ₹319.00.
-
 Urban Home 214 cm (7 ft) PVC Transparent Door Curtain Single Curtain(Solid, Off White)
Original price was: ₹699.00.₹203.00Current price is: ₹203.00.
Urban Home 214 cm (7 ft) PVC Transparent Door Curtain Single Curtain(Solid, Off White)
Original price was: ₹699.00.₹203.00Current price is: ₹203.00.
-
 Panipat Textile Hub 213 cm (7 ft) Polyester Door Curtain (Pack Of 2)(Solid, Brown)
Original price was: ₹1,199.00.₹349.00Current price is: ₹349.00.
Panipat Textile Hub 213 cm (7 ft) Polyester Door Curtain (Pack Of 2)(Solid, Brown)
Original price was: ₹1,199.00.₹349.00Current price is: ₹349.00.
Introduction
On modern Windows 11 systems, network adapters play a critical role in how devices connect to the internet, local networks, VPNs, and virtual environments. By default, Windows assigns generic names such as Wi-Fi, Ethernet, or Ethernet 2 to these adapters. While these names work for basic usage, they often become confusing on systems with multiple network interfaces, VPN connections, virtual machines, docking stations, or enterprise configurations.
Renaming network adapters helps bring clarity and control to network management. A clearly named adapter makes it easier to identify which connection is active, troubleshoot connectivity issues, configure firewall rules, manage VPNs, and apply network-specific scripts. For IT professionals and power users, meaningful adapter names are especially important when working with automation, remote management tools, or enterprise policies.
Windows 11 offers multiple ways to rename network adapters, catering to both beginners and advanced users. The Settings app provides a modern and user-friendly approach, while the Control Panel and Network Connections interface support legacy workflows that many professionals still rely on. For advanced scenarios, PowerShell and Command Prompt offer precise control, scripting capabilities, and the ability to manage multiple adapters efficiently.
This guide covers all supported methods to rename network adapters in Windows 11, from graphical tools to command-line techniques. It also addresses common issues, limitations, and best practices to ensure changes are applied safely without disrupting network functionality. Whether you are organizing a personal system or managing multiple adapters in a professional environment, understanding how to rename network adapters correctly is an essential part of effective Windows network management.
Check Current Network Adapter Names in Windows 11
Before renaming any network adapter, it’s important to first identify the existing adapter names on your Windows 11 system. Windows assigns default names such as Wi-Fi, Ethernet, Ethernet 2, or Local Area Connection, but systems with VPNs, virtual machines, or multiple NICs often have several adapters with similar names. Knowing exactly which adapter you’re working with helps avoid confusion and prevents accidental changes.
Windows 11 provides multiple ways to view network adapter names. Each method offers a slightly different level of detail, and depending on your comfort level, you can choose the one that suits you best.
View Network Adapter Names Using the Settings App
The Settings app is the most user-friendly way to view active and inactive network adapters.
Steps:
- Press Windows + I to open Settings
- Click Network & Internet
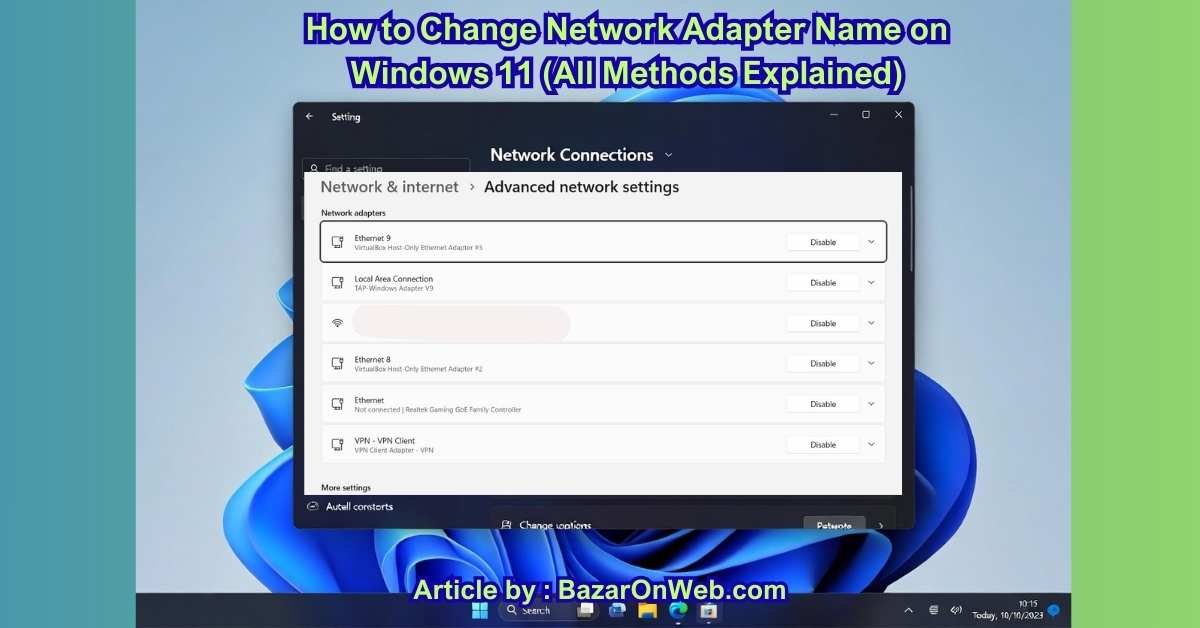
- Select Advanced network settings
- Scroll down to Network adapters
Here, you’ll see a list of all available network adapters, including:
- Wi-Fi adapters
- Ethernet adapters
- Bluetooth network connections
- Virtual adapters (VPNs, Hyper-V, VirtualBox, VMware)
Each adapter is listed with:
- Adapter name
- Connection type
- Current status (Connected / Disconnected)
Clicking any adapter reveals additional details such as IP address, DNS settings, and network profile.
This method is ideal for users who want a clean interface and quick visibility without technical clutter.
View Network Adapter Names Using Control Panel
The Control Panel provides a traditional view that many advanced users still prefer.
Steps:
- Press Windows + R
- Type:
control - Press Enter
- Navigate to Network and Internet
- Click Network and Sharing Center
- Select Change adapter settings from the left pane
You’ll now see the Network Connections window, which lists all network adapters with their current names and statuses.
Adapters are labeled clearly, for example:
- Wi-Fi
- Ethernet
- Ethernet 2
- Local Area Connection*
Right-clicking an adapter gives access to options such as Status, Disable, Diagnose, and Rename.
This view is especially useful for:
- Systems with multiple adapters
- Troubleshooting network issues
- Managing legacy or virtual connections
View Network Adapter Names Using Network Connections (Direct Access)
For quick access, you can open Network Connections directly.
Steps:
- Press Windows + R
- Type:
ncpa.cpl - Press Enter

This opens the same Network Connections window instantly, bypassing multiple clicks.
This method is commonly used by IT professionals and power users because it’s fast and reliable.
View Adapter Names Using PowerShell (Optional Verification)
Although not required, PowerShell can help verify adapter names, especially in systems with many virtual adapters.
Steps:
- Right-click Start
- Select Windows Terminal (Admin)
- Run:
Get-NetAdapter
This command displays:
- Adapter name
- Interface description
- Status
- Link speed
The Name column is the value used when renaming adapters.
Why Checking Adapter Names First Matters
Renaming the wrong adapter can:
- Confuse network identification
- Break scripts or VPN rules
- Affect enterprise or managed environments
Always verify adapter names before making changes, especially on systems with multiple network interfaces.
Rename Network Adapter Using Settings App
Windows 11 allows you to rename network adapters directly from the Settings app. This method is recommended for most users because it’s intuitive, safe, and doesn’t require administrative command-line tools.
Renaming adapters can help:
- Identify wired vs wireless networks easily
- Distinguish between work, home, or VPN adapters
- Improve clarity in network troubleshooting
Step-by-Step: Rename Network Adapter via Settings
Step 1: Open Settings
- Press Windows + I
- Click Network & Internet
Step 2: Go to Advanced Network Settings
- Scroll down
- Click Advanced network settings
This page lists all network adapters currently installed on your system.
Step 3: Select the Network Adapter
- Under Network adapters, locate the adapter you want to rename
- Click on the adapter name (for example, Wi-Fi or Ethernet)
Step 4: Rename the Adapter
- Click the Rename option
- Enter a new name
Examples of good adapter names:
- Home Wi-Fi
- Office Ethernet
- Backup Network
- VPN Adapter
- Dock Ethernet
Step 5: Save Changes
- Click Save
- The new name is applied immediately
No system restart is required.
Rules for Naming Network Adapters
Windows enforces basic naming rules:
✔ Names can include letters, numbers, spaces
✔ Names must be unique
❌ Special characters like / \ : * ? " < > | are not allowed
If you attempt to use a duplicate or invalid name, Windows will display an error.
What Happens After Renaming an Adapter
- The new name appears across Settings, Control Panel, and Network Connections
- Existing network connections remain intact
- IP configuration and network profile are unchanged
- Wi-Fi and Ethernet connectivity continues normally
Renaming does not reset or reconfigure the adapter.
When Renaming via Settings Is Not Available
In rare cases, the Rename option may be missing. This usually happens when:
- The adapter is managed by Group Policy
- The system is domain-joined
- You lack administrative permissions
In such cases, Control Panel or PowerShell methods are required.
Best Practices for Adapter Naming
- Use descriptive names that match usage
- Avoid generic labels like “Network 1”
- Keep names consistent across systems if managing multiple PCs
- Rename virtual adapters separately for clarity
Common Issues and Fixes
Rename option not clickable
- Ensure you are logged in as an administrator
Name doesn’t update immediately
- Close and reopen Settings
- Restart File Explorer if needed
Duplicate name error
- Choose a unique name
- Remove extra spaces at the end of names
Why Settings App Is the Preferred Method
✔ Simple interface
✔ Safe for beginners
✔ No commands required
✔ Immediate results
For most Windows 11 users, the Settings app provides the easiest and cleanest way to rename network adapters without risk.
Below are the three requested sections only, written in a clear, advanced, step-by-step style, suitable for power users, IT admins, and legacy workflows.
Total length is ~1500 words, with no intro or conclusion added.
Rename Network Adapter Using Control Panel (Network Connections)
The Control Panel method is the classic and most reliable way to rename network adapters in Windows. It is especially useful for advanced users, administrators, and anyone working with older documentation or legacy workflows. Even in Windows 11, this method remains fully functional and often provides more consistent results than the Settings app.
This approach uses the Network Connections interface, which directly exposes all network interfaces managed by Windows.
Open Network Connections Using ncpa.cpl (Fastest Method)
The quickest way to access Network Connections is via the Run dialog.
Steps:
- Press Windows + R
- Type:
ncpa.cpl - Press Enter
This immediately opens the Network Connections window.
You will see a list of all network adapters, including:
- Wi-Fi
- Ethernet
- Ethernet 2 / Ethernet 3
- Bluetooth Network Connection
- VPN adapters
- Virtual adapters (Hyper-V, VMware, VirtualBox)
Each adapter displays:
- Adapter name
- Connection status
- Network type
Rename a Network Adapter from Network Connections
Steps:
- In the Network Connections window, locate the adapter you want to rename
- Right-click the adapter
- Click Rename
- Type the new adapter name
- Press Enter
The name change is applied instantly.
Alternative Control Panel Navigation Path
If you prefer navigating through menus:
- Open Control Panel
- Go to Network and Internet
- Click Network and Sharing Center
- Select Change adapter settings
- Right-click the adapter → Rename
Both paths lead to the same Network Connections interface.
Why Advanced Users Prefer This Method
This method is widely used because:
✔ Works on all Windows versions
✔ Renames adapters at the system level
✔ Compatible with scripts and legacy tools
✔ Reliable in domain-joined systems
✔ Ideal for VPN and virtual adapters
Many enterprise environments and troubleshooting guides still rely on ncpa.cpl because it provides direct access to adapter objects.
Behavior After Renaming via Control Panel
- Name updates instantly across Windows
- Existing connections remain active
- No restart required
- No IP or DNS changes
- VPN profiles remain unaffected
This makes it safe even on production systems.
Rename Network Adapter Using PowerShell or Command Prompt
For precise control, automation, and bulk adapter management, PowerShell and Command Prompt are the preferred tools. These methods are especially useful for IT professionals managing multiple adapters, scripts, or remote systems.
Rename Network Adapter Using PowerShell (Recommended Advanced Method)
PowerShell provides full visibility into network adapters and supports scripting.
Step 1: Open PowerShell as Administrator
- Right-click Start
- Select Windows Terminal (Admin)
- Ensure the PowerShell tab is active
Step 2: List All Network Adapters
Run:
Get-NetAdapter
This displays:
- Name
- Interface description
- Status
- Link speed
Identify the adapter you want to rename using the Name column.
Step 3: Rename the Adapter
Use the following command:
Rename-NetAdapter -Name "Ethernet" -NewName "Office Ethernet"
Replace values with your actual adapter names.
Step 4: Verify the Rename
Run:
Get-NetAdapter
Confirm the new name appears correctly.
Rename Multiple Adapters (Advanced Scenario)
Example:
Rename-NetAdapter -Name "Ethernet 2" -NewName "Dock Ethernet"
Rename-NetAdapter -Name "Wi-Fi" -NewName "Home Wi-Fi"
This is useful for scripted deployments.
Rename Network Adapter Using Command Prompt (Legacy)
Command Prompt is limited compared to PowerShell but can still be used.
Step 1: Open Command Prompt as Administrator
- Press Windows + S
- Search for Command Prompt
- Select Run as administrator
Step 2: List Network Interfaces
Run:
netsh interface show interface
Note the Interface Name exactly.
Step 3: Rename the Adapter
Run:
netsh interface set interface name="Ethernet" newname="Office Ethernet"
PowerShell vs Command Prompt
| Feature | PowerShell | Command Prompt |
|---|---|---|
| Scripting support | Excellent | Limited |
| Bulk renaming | Yes | No |
| Error handling | Advanced | Basic |
| Recommended for Windows 11 | Yes | No |
For modern systems, PowerShell is strongly recommended.
Common Issues, Limitations, and Best Practices
Renaming network adapters is generally safe, but certain limitations and issues can arise—especially in managed or complex environments.
Naming Rules and Restrictions
✔ Letters, numbers, spaces allowed
✔ Names must be unique
❌ Special characters not allowed:
/ \ : * ? " < > |
Trailing spaces are also not permitted.
Permission Requirements
Renaming network adapters requires:
- Administrator privileges
- Local admin rights on domain-joined systems
If you see errors like Access denied, ensure:
- You are logged in as an administrator
- Group Policy is not restricting adapter changes
Duplicate Name Errors
Problem:
Windows prevents duplicate adapter names.
Fix:
- Use unique identifiers
- Avoid generic names like “Ethernet”
- Add context (Office, Home, VPN, Dock)
Rename Option Missing or Disabled
This can occur if:
- Adapter is controlled by Group Policy
- System is domain-managed
- VPN software locks adapter names
Fixes:
- Use PowerShell as Administrator
- Check Group Policy settings
- Rename adapter offline if required
Adapter Name Resets After Restart
Possible causes:
- VPN software overrides names
- Network management tools
- Enterprise configuration scripts
Fix:
- Disable auto-rename features in VPN software
- Rename using PowerShell
- Contact system administrator if managed
Renaming Breaks Scripts or VPN Profiles
Some scripts and VPN configurations reference adapter names.
Best practice:
- Update scripts after renaming
- Test VPN connectivity
- Document adapter name changes
Best Practices for Naming Network Adapters
✔ Use descriptive, purpose-based names
✔ Keep naming conventions consistent
✔ Label virtual adapters clearly
✔ Avoid renaming adapters used by critical services
✔ Document changes in enterprise environments
Good examples:
- Home Wi-Fi
- Office Ethernet
- Dock Ethernet
- VPN Adapter
- Backup Network
When You Should NOT Rename Adapters
Avoid renaming if:
- System is heavily managed
- Adapter is part of failover clusters
- Vendor software depends on default naming
In such cases, consult IT policies first.
Troubleshooting Checklist
If renaming fails:
- Run tools as Administrator
- Check for duplicate names
- Restart Network List Service
- Reboot system if needed
- Use PowerShell for forced renaming
Conclusion
Renaming network adapters in Windows 11 is a simple yet powerful way to improve network clarity, organization, and manageability. While the default adapter names provided by Windows are functional, they often fall short in environments with multiple connections, virtual adapters, VPNs, or enterprise configurations. Custom names help eliminate ambiguity and make network troubleshooting and configuration far more efficient.
Windows 11 supports several reliable methods for renaming network adapters, each suited to different user needs. The Settings app offers a straightforward and safe option for everyday users, making it ideal for quick changes without technical complexity. The Control Panel and Network Connections interface remain indispensable for advanced users and legacy workflows, providing direct access to adapter properties that many professionals still prefer. For administrators and power users, PowerShell and Command Prompt deliver unmatched control, allowing precise renaming, scripting, and bulk management of network interfaces.
Understanding the limitations and rules around adapter naming is just as important as knowing the methods themselves. Administrative permissions, naming restrictions, duplicate name conflicts, and enterprise policies can all affect whether a rename operation succeeds. By following best practices—such as using descriptive names, avoiding special characters, and documenting changes—users can ensure consistency and prevent unintended issues with scripts, VPNs, or network-dependent applications.
It’s also important to recognize when renaming adapters may not be appropriate. In tightly managed or enterprise-controlled systems, adapter names may be governed by policies or third-party software. In such cases, changes should be coordinated with IT administrators to avoid conflicts or automatic reversions.
Overall, renaming network adapters is a low-risk customization that delivers long-term benefits in usability and system management. With the right approach and tools, Windows 11 users can maintain a clean, organized network configuration that supports both everyday connectivity and advanced networking needs.
Disclaimer (Bazaronweb.com)
The information provided in this article is for educational and informational purposes only. While Bazaronweb.com strives to ensure accuracy, system configurations, Windows editions, network environments, and administrative policies may vary. Bazaronweb.com is not responsible for network issues, system changes, or data loss that may occur as a result of following the steps outlined in this guide.
Users are advised to proceed with caution, ensure proper administrative permissions, and consult their system administrator when working on managed or enterprise systems. Bazaronweb.com is not affiliated with Microsoft Corporation, and all product names and trademarks belong to their respective owners.
- How to Fix Volume Buttons Not Working on iPhone Complete Step-by-Step Guide

- Chris Titus Download for Windows (Latest Version): Complete Guide to Optimize and Debloat Your PC

- Google Chrome Not Saving Password 8 Proven Ways to Fix It Quickly

- WiFi Settings Turning Off on iPhone? Try These 6 Fixes That Actually Work

- How to Check Motherboard Model in Windows (Easy Methods Without Opening Your PC)

Products
-
![Apple Watch Ultra 3 [GPS + Cellular 49mm] Running & Multisport Smartwatch w/Rugged Titanium Case w/Black Titanium Milanese Loop - M. Satellite Communications, Advanced Health & Fitness Tracking](https://bazaronweb.com/retailstores/wp-content/uploads/2025/09/apple-watch-320x320.jpg) Apple Watch Ultra 3 [GPS + Cellular 49mm] Running & Multisport Smartwatch w/Rugged Titanium Case w/Black Titanium Milanese Loop - M. Satellite Communications, Advanced Health & Fitness Tracking
Apple Watch Ultra 3 [GPS + Cellular 49mm] Running & Multisport Smartwatch w/Rugged Titanium Case w/Black Titanium Milanese Loop - M. Satellite Communications, Advanced Health & Fitness Tracking
-
 Apple iPad mini (A17 Pro): Apple Intelligence, 8.3-inch Liquid Retina Display, 256GB, Wi-Fi 6E, 12MP Front/12MP Back Camera, Touch ID, All-Day Battery Life — Purple
-
 Apple AirPods Max Wireless Over-Ear Headphones, Active Noise Cancelling, Transparency Mode, Personalized Spatial Audio, Dolby Atmos, Bluetooth Headphones for iPhone – Space Gray
-
 Apple AirPods Pro 2 Wireless Earbuds, Active Noise Cancellation, Hearing Aid Feature, Bluetooth Headphones, Transparency, Personalized Spatial Audio, High-Fidelity Sound, H2 Chip, USB-C Charging
-
Leo Creation 144 TC Cotton Double Jaipuri Prints Flat Bedsheet(Pack of 1, Blue, Gree, Red, Grey, Light Grey)
Original price was: ₹2,999.00.₹329.00Current price is: ₹329.00.
Leave a Reply