Discounted Products
-
 Leo Creation 144 TC Cotton Double Jaipuri Prints Flat Bedsheet(Pack of 1, Blue, Gree, Red, Grey, Light Grey)
Original price was: ₹2,999.00.₹329.00Current price is: ₹329.00.
Leo Creation 144 TC Cotton Double Jaipuri Prints Flat Bedsheet(Pack of 1, Blue, Gree, Red, Grey, Light Grey)
Original price was: ₹2,999.00.₹329.00Current price is: ₹329.00.
-
 Home Garage 210 TC Cotton King Floral Fitted (Elastic) Bedsheet(Pack of 1, Grey)
Original price was: ₹999.00.₹299.00Current price is: ₹299.00.
Home Garage 210 TC Cotton King Floral Fitted (Elastic) Bedsheet(Pack of 1, Grey)
Original price was: ₹999.00.₹299.00Current price is: ₹299.00.
-
 Goodrik 140 TC Cotton Double 3D Printed Flat Bedsheet(Pack of 1, Brown)
Original price was: ₹499.00.₹229.00Current price is: ₹229.00.
Goodrik 140 TC Cotton Double 3D Printed Flat Bedsheet(Pack of 1, Brown)
Original price was: ₹499.00.₹229.00Current price is: ₹229.00.
-
 GLOBALSHOP 350 TC Microfiber Double Floral Flat Bedsheet(Pack of 1, Multicolor)
Original price was: ₹1,250.00.₹263.00Current price is: ₹263.00.
GLOBALSHOP 350 TC Microfiber Double Floral Flat Bedsheet(Pack of 1, Multicolor)
Original price was: ₹1,250.00.₹263.00Current price is: ₹263.00.
-
 RisingStar 250 TC Microfiber King Printed Fitted (Elastic) Bedsheet(Pack of 1, FITTED-ROUND-CIRCLES-PREMIUM)
Original price was: ₹2,299.00.₹299.00Current price is: ₹299.00.
RisingStar 250 TC Microfiber King Printed Fitted (Elastic) Bedsheet(Pack of 1, FITTED-ROUND-CIRCLES-PREMIUM)
Original price was: ₹2,299.00.₹299.00Current price is: ₹299.00.
-
 Home Garage 210 TC Cotton King Floral Fitted (Elastic) Bedsheet(Pack of 1, Fitted Black Green)
Original price was: ₹1,299.00.₹299.00Current price is: ₹299.00.
Home Garage 210 TC Cotton King Floral Fitted (Elastic) Bedsheet(Pack of 1, Fitted Black Green)
Original price was: ₹1,299.00.₹299.00Current price is: ₹299.00.
-
 Home Garage 180 TC Cotton King 3D Printed Flat Bedsheet(Pack of 1, White)
Original price was: ₹999.00.₹229.00Current price is: ₹229.00.
Home Garage 180 TC Cotton King 3D Printed Flat Bedsheet(Pack of 1, White)
Original price was: ₹999.00.₹229.00Current price is: ₹229.00.
-
 Home Sizzler 153 cm (5 ft) Polyester Room Darkening Window Curtain (Pack Of 2)(Floral, Maroon)
Original price was: ₹799.00.₹299.00Current price is: ₹299.00.
Home Sizzler 153 cm (5 ft) Polyester Room Darkening Window Curtain (Pack Of 2)(Floral, Maroon)
Original price was: ₹799.00.₹299.00Current price is: ₹299.00.
-
 Panipat Textile Hub 152.4 cm (5 ft) Polyester Window Curtain (Pack Of 2)(Solid, Aqua)
Original price was: ₹1,899.00.₹299.00Current price is: ₹299.00.
Panipat Textile Hub 152.4 cm (5 ft) Polyester Window Curtain (Pack Of 2)(Solid, Aqua)
Original price was: ₹1,899.00.₹299.00Current price is: ₹299.00.
-
 Home Sizzler 214 cm (7 ft) Polyester Semi Transparent Door Curtain (Pack Of 2)(Floral, Maroon)
Original price was: ₹1,199.00.₹399.00Current price is: ₹399.00.
Home Sizzler 214 cm (7 ft) Polyester Semi Transparent Door Curtain (Pack Of 2)(Floral, Maroon)
Original price was: ₹1,199.00.₹399.00Current price is: ₹399.00.
-
 Home Sizzler 153 cm (5 ft) Polyester Room Darkening Window Curtain (Pack Of 2)(Floral, Brown)
Original price was: ₹799.00.₹299.00Current price is: ₹299.00.
Home Sizzler 153 cm (5 ft) Polyester Room Darkening Window Curtain (Pack Of 2)(Floral, Brown)
Original price was: ₹799.00.₹299.00Current price is: ₹299.00.
-
 Stella Creations 214 cm (7 ft) Polyester Room Darkening Door Curtain (Pack Of 2)(Abstract, Brown)
Original price was: ₹1,299.00.₹449.00Current price is: ₹449.00.
Stella Creations 214 cm (7 ft) Polyester Room Darkening Door Curtain (Pack Of 2)(Abstract, Brown)
Original price was: ₹1,299.00.₹449.00Current price is: ₹449.00.
-
 Homefab India 152.5 cm (5 ft) Polyester Room Darkening Window Curtain (Pack Of 2)(Floral, Light Blue)
Original price was: ₹1,199.00.₹319.00Current price is: ₹319.00.
Homefab India 152.5 cm (5 ft) Polyester Room Darkening Window Curtain (Pack Of 2)(Floral, Light Blue)
Original price was: ₹1,199.00.₹319.00Current price is: ₹319.00.
-
 Urban Home 214 cm (7 ft) PVC Transparent Door Curtain Single Curtain(Solid, Off White)
Original price was: ₹699.00.₹203.00Current price is: ₹203.00.
Urban Home 214 cm (7 ft) PVC Transparent Door Curtain Single Curtain(Solid, Off White)
Original price was: ₹699.00.₹203.00Current price is: ₹203.00.
-
 Panipat Textile Hub 213 cm (7 ft) Polyester Door Curtain (Pack Of 2)(Solid, Brown)
Original price was: ₹1,199.00.₹349.00Current price is: ₹349.00.
Panipat Textile Hub 213 cm (7 ft) Polyester Door Curtain (Pack Of 2)(Solid, Brown)
Original price was: ₹1,199.00.₹349.00Current price is: ₹349.00.
Hi everyone, Jessica here! As a busy mom who juggles work, family, and daily tech struggles, I often rely on my computer to stay organized. Between work files, family photos, my kids’ homework, and the occasional recipe search, my computer holds a digital snapshot of our lives. But sometimes, whether for work or parenting, I need to check internet history or file history to track what’s been accessed on my computer.
If you’re in a similar situation—maybe you want to keep tabs on your own browsing habits, monitor your kids’ online activity, or recover an important file—you’ll be glad to know that Windows and macOS both provide tools for this.
In this guide, I’ll walk you through how to check internet history and file history on your computer, step by step, and even share some tips on using third-party tools if you want more control.
Why Would You Want to Check Internet and File History?
Before we dive into the “how,” let’s talk about the “why.” Some common reasons include:
- Parental monitoring: Keeping an eye on your kids’ internet activity to make sure they’re safe.
- Productivity tracking: Checking your own browsing history to identify time-wasting habits.
- Recovering lost files: Finding documents you worked on but forgot where you saved.
- Security checks: Making sure no one else has been using your computer without permission.
Whatever your reason, knowing how to access this information can give you peace of mind and help you stay in control.
Part 1: How to Check Internet History on Your Computer
Every browser (Chrome, Edge, Safari, Firefox, etc.) saves a history of websites you’ve visited. Let’s break it down by the most common browsers.
1. Google Chrome
- Open Chrome.
- Click the three dots in the top-right corner.
- Select History > History.
- You’ll see a list of all the sites you’ve visited. You can search by keyword or filter by date.
👉 Bonus tip: Press Ctrl + H (Windows) or Command + Y (Mac) to open history quickly.
2. Microsoft Edge (Windows 10/11 default browser)
- Open Edge.
- Click the three dots in the upper-right corner.
- Select History (or use the shortcut Ctrl + H).
- You’ll get a full list of browsing history with a search bar at the top.
3. Safari (Mac)
- Open Safari.
- From the top menu, click History.
- Select Show All History.
- You can browse by day or search using the bar in the upper right corner.
4. Mozilla Firefox
- Open Firefox.
- Click the three horizontal lines in the top-right corner.
- Select History > Manage History.
- The Library window opens, letting you search, sort, and organize history.
Clearing vs. Viewing History
Sometimes you might want to delete history instead of just viewing it—for privacy or storage reasons. All browsers let you clear browsing history, cookies, and cached files from their settings. But if you’re a parent, it’s important to know that tech-savvy kids may do this to cover their tracks!
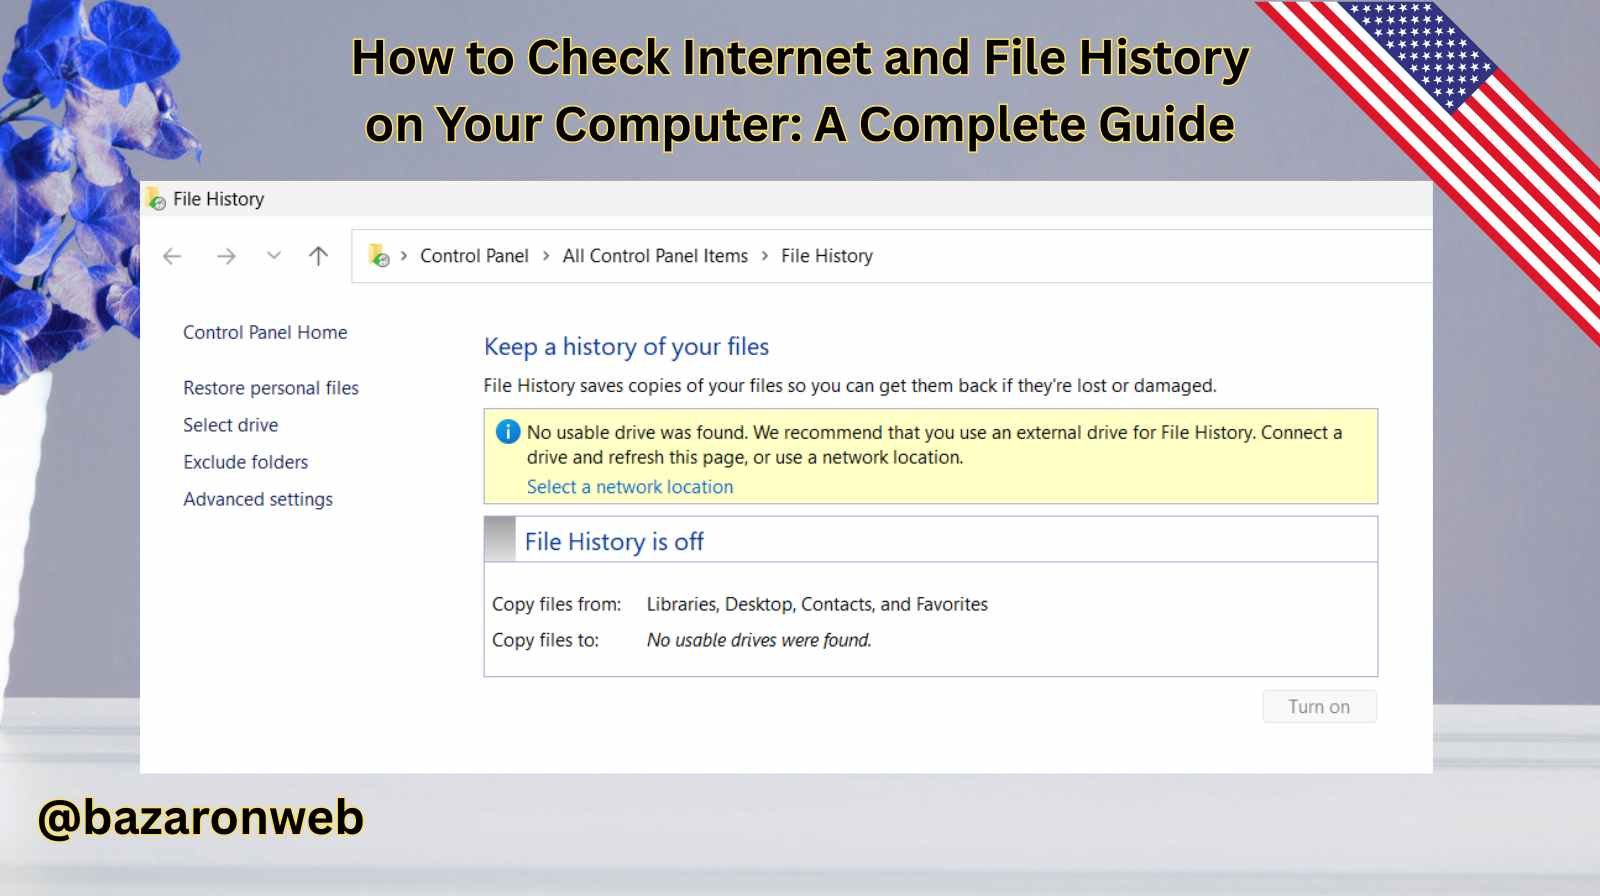
Part 2: How to Check File History on Your Computer
Now, let’s move on to file history, which helps you track the documents, photos, or downloads used on your computer.
On Windows (10 and 11)
- Recent Files in File Explorer
- Open File Explorer.
- Click Quick Access in the left sidebar.
- You’ll see a list of recent files and folders.
- Windows Search
- Use the search bar (next to the Start button).
- Type the name (or part of it) of the file.
- Windows will display recently opened documents that match.
- File History Backup (if enabled)
- Go to Settings > Update & Security > Backup.
- If File History is turned on, you can restore previous versions of your files.
- Event Viewer (Advanced)
- Search for Event Viewer in the Start menu.
- Navigate to Windows Logs > Security.
- You can see logs of file access, though this takes some learning to filter properly.
On Mac (macOS)
- Recent Items
- Click the Apple Menu () in the top-left corner.
- Select Recent Items.
- This shows a list of recently opened apps and files.
- Finder Recents Folder
- Open Finder.
- Click Recents in the sidebar.
- You’ll see all recently opened files, sorted by date.
- Spotlight Search
- Press Command + Spacebar.
- Type the file name or keyword.
- Spotlight shows recent documents matching your query.
- Time Machine (if enabled)
- Connect your backup drive.
- Open Time Machine.
- You can scroll through backups of files by date to recover older versions.
Part 3: Checking Downloads and Specific App History
Apart from browsing and file history, you may also want to track activity in specific apps.
- Downloads:
- Chrome, Edge, Safari, and Firefox all keep a downloads history (shortcut: Ctrl + J in most browsers).
- Microsoft Office / Google Docs:
- Word, Excel, PowerPoint, and Google Docs keep a list of recently opened documents under File > Recent.
- Photos and Videos:
- Windows Photos app and macOS Photos app both organize files by date, making it easy to spot recently added media.
Part 4: Third-Party Tools for Advanced Tracking
If you want more detailed monitoring—for example, as a parent keeping tabs on your kids—third-party apps can help.
- RescueTime – Tracks apps and websites to show productivity patterns.
- Qustodio / Net Nanny – Parental control software for monitoring kids’ internet use.
- LastActivityView (Windows) – Shows a full log of recent activity, including file openings.
Be sure to respect privacy laws and your family’s comfort level when using these tools.
Tips for Parents Checking History
As a mom, I’ve found that technology is a powerful parenting aid, but it’s no replacement for communication. If you’re checking your child’s internet history, remember:
- Talk openly about online safety.
- Set boundaries (like screen time limits).
- Explain why you monitor their activity—so they understand it’s about safety, not mistrust.
- Encourage balance: offline hobbies, reading, or outdoor play.
Security and Privacy Considerations
While checking history is useful, always keep in mind:
- Shared Computers: If multiple people use the same PC or Mac, your history may mix with theirs.
- Private Browsing Mode: Browsers like Chrome’s Incognito Mode won’t save history.
- Deleted History: It’s possible to delete browsing history manually, so gaps may appear.
- Cloud Accounts: Google, Microsoft, and Apple all sync history across devices if you’re signed in.
If you’re trying to be thorough, check not only the local device but also any connected accounts.
Final Thoughts
Checking internet and file history on your computer isn’t difficult once you know where to look. Whether you’re a parent trying to ensure your kids’ safety, a professional trying to recover files, or just someone curious about your own habits, both Windows and Mac provide built-in tools to help.
Sleep, work, family time—it all connects to the way we use our devices. By keeping an eye on history, you can stay organized, improve productivity, and, most importantly, feel more in control of your digital life.
- How to Change the Default Audio Output Device on Windows 11

- How to Fix Taskbar and Settings Not Working After a Windows 11 Update

- How to Fix Microsoft Store Logging You Out Randomly on Windows 11

- How to Fix Volume Shadow Copy Service Errors in Windows (Complete Troubleshooting Guide)

- How to Fix Game Lag After a Windows Update (10 Proven Solutions)

Products
-
![Apple Watch Ultra 3 [GPS + Cellular 49mm] Running & Multisport Smartwatch w/Rugged Titanium Case w/Black Titanium Milanese Loop - M. Satellite Communications, Advanced Health & Fitness Tracking](https://bazaronweb.com/retailstores/wp-content/uploads/2025/09/apple-watch-320x320.jpg) Apple Watch Ultra 3 [GPS + Cellular 49mm] Running & Multisport Smartwatch w/Rugged Titanium Case w/Black Titanium Milanese Loop - M. Satellite Communications, Advanced Health & Fitness Tracking
Apple Watch Ultra 3 [GPS + Cellular 49mm] Running & Multisport Smartwatch w/Rugged Titanium Case w/Black Titanium Milanese Loop - M. Satellite Communications, Advanced Health & Fitness Tracking
-
 Apple iPad mini (A17 Pro): Apple Intelligence, 8.3-inch Liquid Retina Display, 256GB, Wi-Fi 6E, 12MP Front/12MP Back Camera, Touch ID, All-Day Battery Life — Purple
-
 Apple AirPods Max Wireless Over-Ear Headphones, Active Noise Cancelling, Transparency Mode, Personalized Spatial Audio, Dolby Atmos, Bluetooth Headphones for iPhone – Space Gray
-
 Apple AirPods Pro 2 Wireless Earbuds, Active Noise Cancellation, Hearing Aid Feature, Bluetooth Headphones, Transparency, Personalized Spatial Audio, High-Fidelity Sound, H2 Chip, USB-C Charging
-
Leo Creation 144 TC Cotton Double Jaipuri Prints Flat Bedsheet(Pack of 1, Blue, Gree, Red, Grey, Light Grey)
Original price was: ₹2,999.00.₹329.00Current price is: ₹329.00.
Leave a Reply