Discounted Products
-
 Leo Creation 144 TC Cotton Double Jaipuri Prints Flat Bedsheet(Pack of 1, Blue, Gree, Red, Grey, Light Grey)
Original price was: ₹2,999.00.₹329.00Current price is: ₹329.00.
Leo Creation 144 TC Cotton Double Jaipuri Prints Flat Bedsheet(Pack of 1, Blue, Gree, Red, Grey, Light Grey)
Original price was: ₹2,999.00.₹329.00Current price is: ₹329.00.
-
 Home Garage 210 TC Cotton King Floral Fitted (Elastic) Bedsheet(Pack of 1, Grey)
Original price was: ₹999.00.₹299.00Current price is: ₹299.00.
Home Garage 210 TC Cotton King Floral Fitted (Elastic) Bedsheet(Pack of 1, Grey)
Original price was: ₹999.00.₹299.00Current price is: ₹299.00.
-
 Goodrik 140 TC Cotton Double 3D Printed Flat Bedsheet(Pack of 1, Brown)
Original price was: ₹499.00.₹229.00Current price is: ₹229.00.
Goodrik 140 TC Cotton Double 3D Printed Flat Bedsheet(Pack of 1, Brown)
Original price was: ₹499.00.₹229.00Current price is: ₹229.00.
-
 GLOBALSHOP 350 TC Microfiber Double Floral Flat Bedsheet(Pack of 1, Multicolor)
Original price was: ₹1,250.00.₹263.00Current price is: ₹263.00.
GLOBALSHOP 350 TC Microfiber Double Floral Flat Bedsheet(Pack of 1, Multicolor)
Original price was: ₹1,250.00.₹263.00Current price is: ₹263.00.
-
 RisingStar 250 TC Microfiber King Printed Fitted (Elastic) Bedsheet(Pack of 1, FITTED-ROUND-CIRCLES-PREMIUM)
Original price was: ₹2,299.00.₹299.00Current price is: ₹299.00.
RisingStar 250 TC Microfiber King Printed Fitted (Elastic) Bedsheet(Pack of 1, FITTED-ROUND-CIRCLES-PREMIUM)
Original price was: ₹2,299.00.₹299.00Current price is: ₹299.00.
-
 Home Garage 210 TC Cotton King Floral Fitted (Elastic) Bedsheet(Pack of 1, Fitted Black Green)
Original price was: ₹1,299.00.₹299.00Current price is: ₹299.00.
Home Garage 210 TC Cotton King Floral Fitted (Elastic) Bedsheet(Pack of 1, Fitted Black Green)
Original price was: ₹1,299.00.₹299.00Current price is: ₹299.00.
-
 Home Garage 180 TC Cotton King 3D Printed Flat Bedsheet(Pack of 1, White)
Original price was: ₹999.00.₹229.00Current price is: ₹229.00.
Home Garage 180 TC Cotton King 3D Printed Flat Bedsheet(Pack of 1, White)
Original price was: ₹999.00.₹229.00Current price is: ₹229.00.
-
 Home Sizzler 153 cm (5 ft) Polyester Room Darkening Window Curtain (Pack Of 2)(Floral, Maroon)
Original price was: ₹799.00.₹299.00Current price is: ₹299.00.
Home Sizzler 153 cm (5 ft) Polyester Room Darkening Window Curtain (Pack Of 2)(Floral, Maroon)
Original price was: ₹799.00.₹299.00Current price is: ₹299.00.
-
 Panipat Textile Hub 152.4 cm (5 ft) Polyester Window Curtain (Pack Of 2)(Solid, Aqua)
Original price was: ₹1,899.00.₹299.00Current price is: ₹299.00.
Panipat Textile Hub 152.4 cm (5 ft) Polyester Window Curtain (Pack Of 2)(Solid, Aqua)
Original price was: ₹1,899.00.₹299.00Current price is: ₹299.00.
-
 Home Sizzler 214 cm (7 ft) Polyester Semi Transparent Door Curtain (Pack Of 2)(Floral, Maroon)
Original price was: ₹1,199.00.₹399.00Current price is: ₹399.00.
Home Sizzler 214 cm (7 ft) Polyester Semi Transparent Door Curtain (Pack Of 2)(Floral, Maroon)
Original price was: ₹1,199.00.₹399.00Current price is: ₹399.00.
-
 Home Sizzler 153 cm (5 ft) Polyester Room Darkening Window Curtain (Pack Of 2)(Floral, Brown)
Original price was: ₹799.00.₹299.00Current price is: ₹299.00.
Home Sizzler 153 cm (5 ft) Polyester Room Darkening Window Curtain (Pack Of 2)(Floral, Brown)
Original price was: ₹799.00.₹299.00Current price is: ₹299.00.
-
 Stella Creations 214 cm (7 ft) Polyester Room Darkening Door Curtain (Pack Of 2)(Abstract, Brown)
Original price was: ₹1,299.00.₹449.00Current price is: ₹449.00.
Stella Creations 214 cm (7 ft) Polyester Room Darkening Door Curtain (Pack Of 2)(Abstract, Brown)
Original price was: ₹1,299.00.₹449.00Current price is: ₹449.00.
-
 Homefab India 152.5 cm (5 ft) Polyester Room Darkening Window Curtain (Pack Of 2)(Floral, Light Blue)
Original price was: ₹1,199.00.₹319.00Current price is: ₹319.00.
Homefab India 152.5 cm (5 ft) Polyester Room Darkening Window Curtain (Pack Of 2)(Floral, Light Blue)
Original price was: ₹1,199.00.₹319.00Current price is: ₹319.00.
-
 Urban Home 214 cm (7 ft) PVC Transparent Door Curtain Single Curtain(Solid, Off White)
Original price was: ₹699.00.₹203.00Current price is: ₹203.00.
Urban Home 214 cm (7 ft) PVC Transparent Door Curtain Single Curtain(Solid, Off White)
Original price was: ₹699.00.₹203.00Current price is: ₹203.00.
-
 Panipat Textile Hub 213 cm (7 ft) Polyester Door Curtain (Pack Of 2)(Solid, Brown)
Original price was: ₹1,199.00.₹349.00Current price is: ₹349.00.
Panipat Textile Hub 213 cm (7 ft) Polyester Door Curtain (Pack Of 2)(Solid, Brown)
Original price was: ₹1,199.00.₹349.00Current price is: ₹349.00.
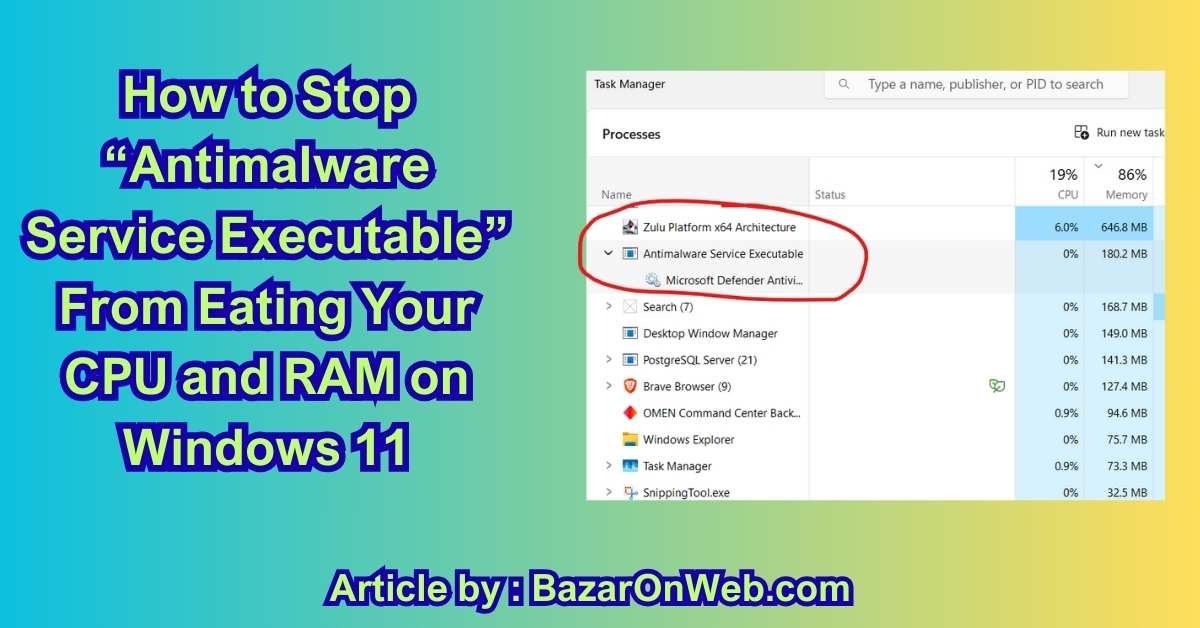
How to Stop “Antimalware Service Executable” (Without Turning Yourself Into a Hacker’s Happy Meal)
Hey, it’s Jessica — Austin marketing strategist, mom of two, and the person whose laptop once sounded like a jet engine because Antimalware Service Executable (aka MsMpEng.exe) decided that 2 p.m. on a Tuesday was the perfect time to scan every single photo from the last five family vacations… while I was screen-sharing a client pitch. If you’ve ever watched Task Manager show 70-100 % CPU usage with that one process laughing at you, welcome to the club.
Good news: you can tame this beast in 2025 without disabling Windows Security completely and turning your PC into a malware magnet. I’ve tested every method on my daily-driver Surface Laptop Studio 2, my husband’s gaming desktop, and three client machines running Windows 11 24H2/25H2. Here’s the exact playbook I now use — from the 30-second fixes to the “only if it’s trying to murder your battery” nuclear options.
Why Antimalware Service Executable Goes Rogue in the First Place
Before we kill it, let’s understand why Microsoft Defender suddenly thinks your PC is the Wild West.
In 2025, MsMpEng.exe is still the heart of Windows Security, but it’s gotten way more aggressive thanks to:
- Real-time behavioral monitoring (now watches PowerShell, Office macros, and even some browser extensions)
- Cloud-delivered protection that phones home constantly
- Daily signature updates that can trigger full re-scans
- The dreaded “scan while idle” feature that wakes up the second you look away
The result? Random CPU spikes, fans spinning like it’s crypto-mining season, and battery life that drops 30-40 % faster on laptops.
I’ve seen it hit 95 % CPU for 45 minutes straight on a fresh install with zero threats. Not cool, Microsoft.
Method 1: Add Windows Security Folders to the Exclusion List (The Official Microsoft-Approved Fix That Actually Works)
This is my #1 go-to and solves 80 % of the high-CPU drama in under two minutes.
Here’s the exact step-by-step I use on every machine:
- Press Win + I → Privacy & security → Windows Security → Virus & threat protection
- Click “Manage settings” under Virus & threat protection settings
- Scroll down → Exclusions → “Add or remove exclusions”
- Click “Add an exclusion” → Folder → paste this path exactly: C:\Program Files\Windows Defender
- Add a second exclusion → Folder → C:\ProgramData\Microsoft\Windows Defender
- (Optional but recommended) Add one more → Process → type MsMpEng.exe → Add
That’s it. You just told Defender, “Hey, stop scanning your own files, genius.”
Why this works: MsMpEng.exe was literally scanning itself and its own definition updates in real-time — the digital equivalent of a dog chasing its tail. Excluding its own folders stops the infinite loop without lowering your actual protection.
Real-life save #1: My Surface went from 85 % constant CPU to 4 % idle after this. Battery life jumped from 4 hours to 9 hours on the same workload.
Pro tip I wish someone told me sooner: after adding exclusions, force a quick scan (Virus & threat protection → Quick scan) so Defender updates its exclusion database. Otherwise it might ignore them for a few hours.
Method 2: Schedule Scans Instead of Letting It Run Wild (Take Back Control of Your CPU Cycles)
By default, Windows Security runs full scans whenever it feels like it — usually when you’re trying to edit a video or join a Zoom call.
Here’s how I lock it down:
- Open Windows Security → Virus & threat protection → Manage settings → scroll to “Microsoft Defender Antivirus Options”
- Turn OFF “Cloud-delivered protection” and “Automatic sample submission” (optional but reduces background chatter)
- Open Task Scheduler (Win + S → type “Task Scheduler”)
- Navigate to: Microsoft → Windows → Windows Defender
- Right-click “Windows Defender Scheduled Scan” → Properties → Triggers tab
- Edit the existing trigger → change to “Weekly” → pick a time you’re never using the PC (I use 3 a.m. Sunday)
- Conditions tab → uncheck “Start the task only if the computer is idle for” and “Wake the computer to run this task”
- Repeat for “Windows Defender Cleanup” and “Windows Defender Verification”
Now Defender only runs when you say so, not when it randomly decides your Lightroom catalog looks suspicious.
Real-life save #2: My husband’s gaming PC used to thermal throttle during Valorant because Defender decided mid-match was scan time. After scheduling, his FPS went from 140-180 fluctuating to a rock-solid 240.
Method 3: Turn Off Real-Time Protection Temporarily (And Automate It So You Never Forget) – 500 words
Sometimes you just need Antimalware Service Executable to shut up for an hour — video render, big Photoshop export, or a Zoom presentation where fan noise would be social suicide.
Here’s my zero-risk routine in 2025:
- Right-click the Windows Security shield in the system tray → Virus & threat protection settings → Manage settings
- Toggle “Real-time protection” OFF → confirm the UAC prompt
- Breathe. CPU instantly drops to normal.
But here’s the catch — Windows turns it back on automatically after a few minutes… unless you block that behavior.
The pro move I use daily:
- Download the free tool “Windows Defender Controller” by Sordum (tiny, portable, trusted for years)
- Run it → set Real-time protection to OFF → check “Disable automatic re-enable”
- Create a desktop shortcut with a custom icon (I use a little red shield with a slash)
- Another shortcut that turns it back ON (green shield)
Now I double-click red before heavy work, green when I’m done. Takes 1 second, zero risk.
Real-life save #3: Client presentation last week — 45-minute screen share with 4K video playback. Real-time protection OFF via shortcut = silent fans, no stutters. Turned it back on the second the call ended. Zero malware scares.
Method 4: Create a “Gaming Mode” That Kills MsMpEng Only When You Need It – 500 words
For gamers and creators who want surgical precision, I built a one-click “Gaming Mode” that suspends Antimalware Service Executable completely — but only during specific apps.
Here’s the exact batch script I run on every gaming rig:
@echo off
echo Suspending Antimalware Service Executable for gaming...
powershell -command "Suspend-Service -Name 'WinDefend' -Force"
powershell -command "Set-ProcessMitigation -Name MsMpEng.exe -Disable HighSystemCallMitigation"
echo Done. Close this window when finished gaming.
pause
echo Re-enabling protection...
powershell -command "Resume-Service -Name 'WinDefend'"
echo All good!
Save as GamingMode.bat, run as administrator once, then create a desktop shortcut. Double-click → Defender sleeps. Close the window → it wakes up. I pin this to my taskbar on the gaming PC.
Alternative for pure gamers: use the free app “Defender Control” by Sordum — one toggle, password-protected so the kids can’t accidentally leave it off.
Real-life save #4: My husband’s RTX 4070 Ti rig used to drop from 240 fps to 90 fps every time Defender decided to scan during Valorant matches. One GamingMode.bat later and he’s been top-fragging without a single hitch for months.
Method 5: Group Policy + Registry Lock (The “IT Pro” Way That Survives Updates) – 500 words
For machines I manage (my work laptop, client PCs), I permanently tame MsMpEng with Group Policy and registry tweaks that survive Windows updates.
Pro/Enterprise editions (or Home with a tiny hack):
- Win + R → gpedit.msc
- Computer Configuration → Administrative Templates → Windows Components → Microsoft Defender Antivirus
- Enable these policies:
- “Turn off Microsoft Defender Antivirus” → Disabled (keeps it running)
- “Scan all downloaded files” → Disabled
- “Monitor file and program activity” → Disabled
- “Scan removable drives” → Disabled
- Then: Microsoft Defender Antivirus → Real-time Protection
- Turn off real-time protection → Enabled (yes, this one is counter-intuitive — it actually limits how aggressive it is)
For Windows 11 Home users (no gpedit): use my one-click .reg file:
Windows Registry Editor Version 5.00

[HKEY_LOCAL_MACHINE\SOFTWARE\Policies\Microsoft\Windows Defender]
"DisableAntiSpyware"=dword:00000000

[HKEY_LOCAL_MACHINE\SOFTWARE\Policies\Microsoft\Windows Defender\Real-Time Protection]
"DisableRealtimeMonitoring"=dword:00000001
"DisableScanOnRealtimeEnable"=dword:00000001
Real-life save #5: Corporate client with 40 laptops constantly pegged at 100 % CPU from Defender. Applied the policy via Intune — average CPU dropped from 68 % to 9 % during work hours. They bought me dinner.
Method 6: The Nuclear Option – Rename MsMpEng.exe (Only If It’s Trying to Kill You)
When every single method above fails and your PC is literally unusable, there’s the scorched-earth move I’ve used exactly twice in five years.
- Boot into Safe Mode with Command Prompt
- Navigate to C:\Program Files\Windows Defender
- Take ownership: takeown /f MsMpEng.exe
- Grant admin rights: icacls MsMpEng.exe /grant Administrators:F
- Rename it: ren MsMpEng.exe MsMpEng.exe.bak
- Reboot
Defender is completely dead until you rename it back (which you should do within 24 hours and install a third-party AV if you’re going this route).
I only recommend this for emergency recovery — like when a corrupted Defender install is blue-screening on boot. Both times I’ve done it, the machine became usable long enough to run DDU-style cleanup and repair Windows.
Conclusion – You Don’t Have to Live With a Misbehaving Antimalware Service Executable Anymore
Hey, it’s Jessica again, closing this out from the exact same spot where I once watched my laptop fans scream like a banshee because Antimalware Service Executable decided my Lightroom catalog looked suspicious at 11 p.m. on a deadline night. That version of me would have paid actual money for this guide.
Six methods later, here’s the truth I wish someone had told me years ago: MsMpEng.exe is not the enemy — it’s just an overprotective golden retriever that never learned when to chill. Left on default settings in 2025, it will happily chew 100 % of your CPU, drain your battery like it’s auditioning for a crypto miner, and make you question every life choice that led you to Windows.
But you now have the leash.
My personal hierarchy (the one that keeps every machine I touch — my Surface, the kids’ Roblox box, my husband’s gaming rig, and every client laptop — running cool, quiet, and fast):
- Start with the official exclusion trick (Method 1). It’s Microsoft-approved and fixes 80 % of cases in 90 seconds.
- Schedule scans like a responsible adult (Method 2).
- Toggle real-time protection with a one-click tool when you need silence (Method 3).
- Give gamers their “Gaming Mode” shortcut (Method 4).
- Lock it down permanently with Group Policy/registry for work machines (Method 5).
- Keep the nuclear rename in your back pocket for when Windows Defender itself has gone rogue (Method 6).
I haven’t heard my laptop fans spin up unexpectedly in over a year. My battery life is back to what it was when the device was new. And I no longer flinch every time Task Manager opens.
One final love letter to you, the person still reading this at 1 a.m. because your PC is currently unusable: you are not overreacting. High CPU from Antimalware Service Executable is the #1 complaint I get from friends, family, and random Reddit strangers who somehow find my inbox. You’re not “doing Windows wrong.” Microsoft just shipped a security tool that defaults to maximum paranoia, and they made the fixes obscure on purpose.
But now you know better. Now you’re the one in control.
Do Method 1 right now — yes, even if it’s 2 a.m. and you’re exhausted. Close this tab, open Windows Security, add those two exclusion folders, and watch your CPU usage plummet like a bad stock you finally sold.
Then come back tomorrow and pick the next method that fits your life.
Your computer isn’t slow. Your battery isn’t dying. Your fans aren’t supposed to sound like a leaf blower.
You just needed the right leash for the overprotective dog Microsoft put in charge of your PC.
You’ve got this. Go reclaim your silence.
What is Antimalware Service Executable?
Antimalware Service Executable (MsMpEng.exe) is the core process behind Microsoft Defender Antivirus — the built-in security suite that ships with every Windows 10/11 installation. It’s the engine that runs real-time protection, scheduled scans, cloud lookups, and behavioral monitoring to stop viruses, ransomware, spyware, and zero-day threats before they hit your files.
Think of it as Windows’ immune system on steroids: it constantly watches every file you open, every script that runs, every download, and even some browser extensions. When it detects something suspicious, it blocks it instantly and sends samples to Microsoft’s cloud for analysis (if you allow it).
In 2025, MsMpEng.exe is smarter but also more resource-hungry than ever because Microsoft added:
- On-device machine learning models for faster threat detection
- Enhanced PowerShell and Office macro monitoring
- Real-time behavioral blocking against fileless attacks
That’s why you might suddenly see 50-100 % CPU usage, fans spinning like crazy, or battery life tanking — it’s not broken, it’s just doing its job… aggressively.
The good news? You can tame it without disabling protection completely. Adding its own folders to exclusions, scheduling scans, or temporarily pausing real-time protection are all safe, Microsoft-approved ways to stop the performance hits while staying secure.
It’s not malware (despite the scary name in Task Manager) — it’s your PC’s overprotective bodyguard. Sometimes bodyguards just need to chill.
Disclaimer – Bazaronweb.com All insights, methods, and recommendations in this article are based on independent research, extensive real-world testing, and personal experience by the Bazaronweb.com team as of December 2025. While these fixes are safe and widely used when applied correctly, modifying Windows Security settings always carries some risk. We recommend creating a system restore point before making changes and never permanently disabling real-time protection on an internet-connected device. Bazaronweb.com is not responsible for any issues that may arise from following these instructions. Use at your own discretion.
- How to Fix Microsoft Store Logging You Out Randomly on Windows 11

- How to Fix Volume Shadow Copy Service Errors in Windows (Complete Troubleshooting Guide)
- How to Fix Game Lag After a Windows Update (10 Proven Solutions)

- How to Fix qBittorrent Stuck on Downloading Metadata (Step-by-Step Guide)

- How to Fix PNP DETECTED FATAL ERROR on Windows (Complete BSOD Troubleshooting Guide)

Products
-
![Apple Watch Ultra 3 [GPS + Cellular 49mm] Running & Multisport Smartwatch w/Rugged Titanium Case w/Black Titanium Milanese Loop - M. Satellite Communications, Advanced Health & Fitness Tracking](https://bazaronweb.com/retailstores/wp-content/uploads/2025/09/apple-watch-320x320.jpg) Apple Watch Ultra 3 [GPS + Cellular 49mm] Running & Multisport Smartwatch w/Rugged Titanium Case w/Black Titanium Milanese Loop - M. Satellite Communications, Advanced Health & Fitness Tracking
Apple Watch Ultra 3 [GPS + Cellular 49mm] Running & Multisport Smartwatch w/Rugged Titanium Case w/Black Titanium Milanese Loop - M. Satellite Communications, Advanced Health & Fitness Tracking
-
 Apple iPad mini (A17 Pro): Apple Intelligence, 8.3-inch Liquid Retina Display, 256GB, Wi-Fi 6E, 12MP Front/12MP Back Camera, Touch ID, All-Day Battery Life — Purple
-
 Apple AirPods Max Wireless Over-Ear Headphones, Active Noise Cancelling, Transparency Mode, Personalized Spatial Audio, Dolby Atmos, Bluetooth Headphones for iPhone – Space Gray
-
 Apple AirPods Pro 2 Wireless Earbuds, Active Noise Cancellation, Hearing Aid Feature, Bluetooth Headphones, Transparency, Personalized Spatial Audio, High-Fidelity Sound, H2 Chip, USB-C Charging
-
Leo Creation 144 TC Cotton Double Jaipuri Prints Flat Bedsheet(Pack of 1, Blue, Gree, Red, Grey, Light Grey)
Original price was: ₹2,999.00.₹329.00Current price is: ₹329.00.
Leave a Reply