Discounted Products
-
 Home Garage 210 TC Cotton King Floral Fitted (Elastic) Bedsheet(Pack of 1, Grey)
Original price was: ₹999.00.₹299.00Current price is: ₹299.00.
Home Garage 210 TC Cotton King Floral Fitted (Elastic) Bedsheet(Pack of 1, Grey)
Original price was: ₹999.00.₹299.00Current price is: ₹299.00.
-
 Goodrik 140 TC Cotton Double 3D Printed Flat Bedsheet(Pack of 1, Brown)
Original price was: ₹499.00.₹229.00Current price is: ₹229.00.
Goodrik 140 TC Cotton Double 3D Printed Flat Bedsheet(Pack of 1, Brown)
Original price was: ₹499.00.₹229.00Current price is: ₹229.00.
-
 GLOBALSHOP 350 TC Microfiber Double Floral Flat Bedsheet(Pack of 1, Multicolor)
Original price was: ₹1,250.00.₹263.00Current price is: ₹263.00.
GLOBALSHOP 350 TC Microfiber Double Floral Flat Bedsheet(Pack of 1, Multicolor)
Original price was: ₹1,250.00.₹263.00Current price is: ₹263.00.
-
 RisingStar 250 TC Microfiber King Printed Fitted (Elastic) Bedsheet(Pack of 1, FITTED-ROUND-CIRCLES-PREMIUM)
Original price was: ₹2,299.00.₹299.00Current price is: ₹299.00.
RisingStar 250 TC Microfiber King Printed Fitted (Elastic) Bedsheet(Pack of 1, FITTED-ROUND-CIRCLES-PREMIUM)
Original price was: ₹2,299.00.₹299.00Current price is: ₹299.00.
-
 Home Garage 210 TC Cotton King Floral Fitted (Elastic) Bedsheet(Pack of 1, Fitted Black Green)
Original price was: ₹1,299.00.₹299.00Current price is: ₹299.00.
Home Garage 210 TC Cotton King Floral Fitted (Elastic) Bedsheet(Pack of 1, Fitted Black Green)
Original price was: ₹1,299.00.₹299.00Current price is: ₹299.00.
-
 Home Garage 180 TC Cotton King 3D Printed Flat Bedsheet(Pack of 1, White)
Original price was: ₹999.00.₹229.00Current price is: ₹229.00.
Home Garage 180 TC Cotton King 3D Printed Flat Bedsheet(Pack of 1, White)
Original price was: ₹999.00.₹229.00Current price is: ₹229.00.
-
 Panipat Textile Hub 152.4 cm (5 ft) Polyester Window Curtain (Pack Of 2)(Solid, Aqua)
Original price was: ₹1,899.00.₹299.00Current price is: ₹299.00.
Panipat Textile Hub 152.4 cm (5 ft) Polyester Window Curtain (Pack Of 2)(Solid, Aqua)
Original price was: ₹1,899.00.₹299.00Current price is: ₹299.00.
-
 Home Sizzler 214 cm (7 ft) Polyester Semi Transparent Door Curtain (Pack Of 2)(Floral, Maroon)
Original price was: ₹1,199.00.₹399.00Current price is: ₹399.00.
Home Sizzler 214 cm (7 ft) Polyester Semi Transparent Door Curtain (Pack Of 2)(Floral, Maroon)
Original price was: ₹1,199.00.₹399.00Current price is: ₹399.00.
-
 Home Sizzler 153 cm (5 ft) Polyester Room Darkening Window Curtain (Pack Of 2)(Floral, Brown)
Original price was: ₹799.00.₹299.00Current price is: ₹299.00.
Home Sizzler 153 cm (5 ft) Polyester Room Darkening Window Curtain (Pack Of 2)(Floral, Brown)
Original price was: ₹799.00.₹299.00Current price is: ₹299.00.
-
 Stella Creations 214 cm (7 ft) Polyester Room Darkening Door Curtain (Pack Of 2)(Abstract, Brown)
Original price was: ₹1,299.00.₹449.00Current price is: ₹449.00.
Stella Creations 214 cm (7 ft) Polyester Room Darkening Door Curtain (Pack Of 2)(Abstract, Brown)
Original price was: ₹1,299.00.₹449.00Current price is: ₹449.00.
-
 Homefab India 152.5 cm (5 ft) Polyester Room Darkening Window Curtain (Pack Of 2)(Floral, Light Blue)
Original price was: ₹1,199.00.₹319.00Current price is: ₹319.00.
Homefab India 152.5 cm (5 ft) Polyester Room Darkening Window Curtain (Pack Of 2)(Floral, Light Blue)
Original price was: ₹1,199.00.₹319.00Current price is: ₹319.00.
-
 Urban Home 214 cm (7 ft) PVC Transparent Door Curtain Single Curtain(Solid, Off White)
Original price was: ₹699.00.₹203.00Current price is: ₹203.00.
Urban Home 214 cm (7 ft) PVC Transparent Door Curtain Single Curtain(Solid, Off White)
Original price was: ₹699.00.₹203.00Current price is: ₹203.00.
-
 Panipat Textile Hub 213 cm (7 ft) Polyester Door Curtain (Pack Of 2)(Solid, Brown)
Original price was: ₹1,199.00.₹349.00Current price is: ₹349.00.
Panipat Textile Hub 213 cm (7 ft) Polyester Door Curtain (Pack Of 2)(Solid, Brown)
Original price was: ₹1,199.00.₹349.00Current price is: ₹349.00.
-
 Home Sizzler 214 cm (7 ft) Polyester Semi Transparent Door Curtain (Pack Of 2)(Floral, Brown)
Original price was: ₹999.00.₹349.00Current price is: ₹349.00.
Home Sizzler 214 cm (7 ft) Polyester Semi Transparent Door Curtain (Pack Of 2)(Floral, Brown)
Original price was: ₹999.00.₹349.00Current price is: ₹349.00.
-
 Panipat Textile Hub 213 cm (7 ft) Polyester Semi Transparent Door Curtain (Pack Of 2)(Floral, Brown)
Original price was: ₹899.00.₹299.00Current price is: ₹299.00.
Panipat Textile Hub 213 cm (7 ft) Polyester Semi Transparent Door Curtain (Pack Of 2)(Floral, Brown)
Original price was: ₹899.00.₹299.00Current price is: ₹299.00.
When Your Screenshots Folder Became a Mess
I use Windows + Print Screen constantly. Screenshots of error messages, funny internet moments, things I want to remember. But after months, my Screenshots folder had accumulated over 800 images. Thousands of files scattered across the default Pictures > Screenshots location.
The problem was that this default location wasn’t where I actually wanted my screenshots. I had a dedicated folder on a different drive for media files. Screenshots ended up in the wrong place, buried in the Pictures folder alongside actual photos.
Every time I wanted to find a screenshot, I had to navigate: Pictures > Screenshots > dig through hundreds of files. It was tedious.
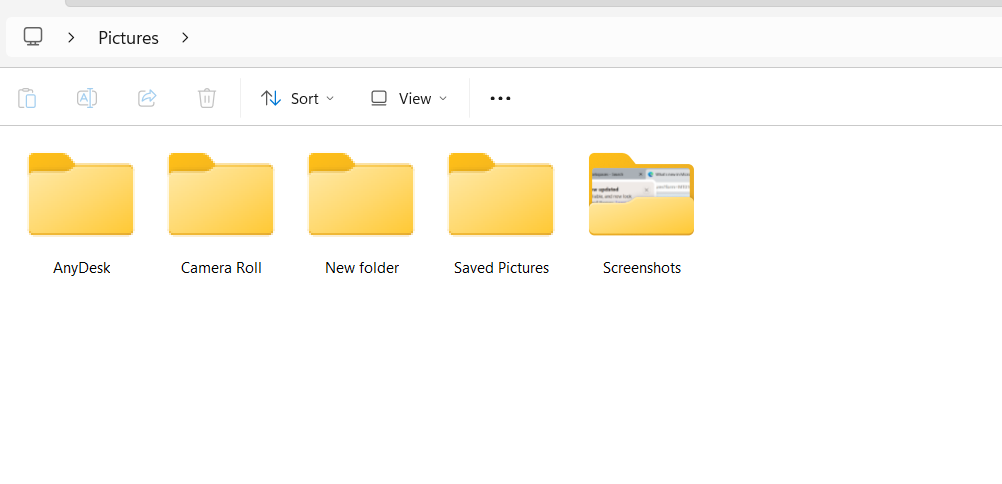
I figured there must be a way to change the default screenshot location. But Windows 11 doesn’t make this obvious. There’s no straightforward settings option saying “Change screenshot folder.” You have to know which settings to modify and how to do it.
After investigating, I discovered there are actually multiple ways to change where screenshots save, each with different advantages depending on what you’re trying to accomplish.
Most people don’t know you can even change this. They just accept the default location and deal with disorganization. But if you know how, you can save screenshots exactly where you want them.
Understanding How Windows Screenshots Work
Before changing the location, understanding how Windows handles screenshots helps explain your options.
When you press Windows + Print Screen, Windows captures your screen and automatically saves it as a PNG image in the default Screenshots folder (usually C:\Users\[YourUsername]\Pictures\Screenshots).
This is different from older print screen behavior (which just copied to clipboard). Windows 11 automatically saves and organizes screenshots for you.
The Screenshots folder is a standard Windows folder created by default. You can move it, rename it, or change where Windows saves screenshots entirely.
The tricky part is that Windows 11 doesn’t provide an obvious settings option to change this default location. You have to modify the folder location through more indirect methods.
Method 1: Move the Screenshots Folder (Simplest)
The easiest way to change screenshot location is moving the Screenshots folder itself to wherever you want it.
Open File Explorer. Navigate to C:\Users\[YourUsername]\Pictures\Screenshots.
Right-click the Screenshots folder. Select “Cut” (or use Ctrl+X).
Navigate to wherever you want the folder to be (another drive, different folder, etc.).
Right-click in the empty space. Select “Paste” (or use Ctrl+V).
The Screenshots folder is now moved. When you take a screenshot, Windows automatically saves it to the new location.
This is the simplest method because Windows automatically updates where it saves screenshots—you don’t need to modify any settings.
Important note: If Windows can’t find the Screenshots folder in its expected location, it might create a new one in the original Pictures folder. This is why the next method is more reliable.
Method 2: Rename and Recreate (More Reliable)
If moving the folder creates a new empty Screenshots folder in Pictures, this method prevents that.
Navigate to C:\Users\[YourUsername]\Pictures\Screenshots.
Cut the entire Screenshots folder and paste it where you want it (a different drive, Documents folder, etc.).
Now, in the original Pictures folder location, Windows will try to create a new Screenshots folder when you take a screenshot. Let it create the empty folder.
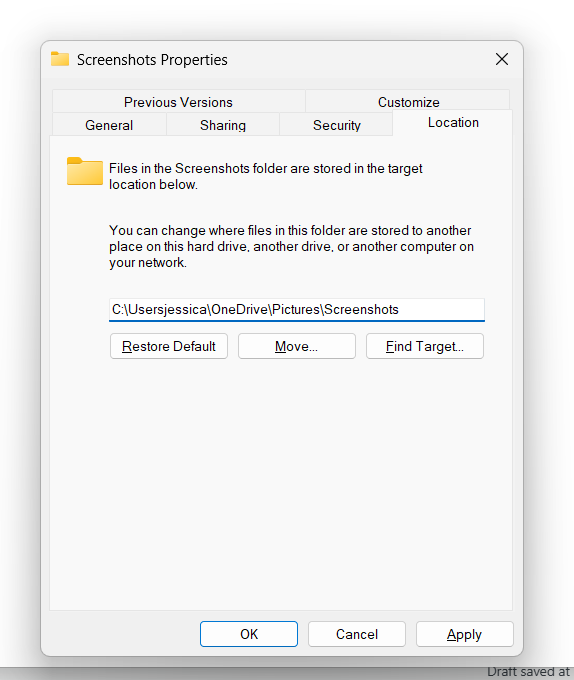
Right-click this empty Screenshots folder. Select “Properties.”
Click the “Location” tab. Click “Move.” Browse to where you moved your actual Screenshots folder.
This tells Windows that the Screenshots folder is now in this new location. All future screenshots save there.
This method ensures Windows always knows where screenshots go, even if Windows updates or resets occur.
Method 3: Disable Auto-Save and Use Clipboard (Alternative Approach)
If you don’t want Windows automatically saving screenshots, you can disable auto-save and manually save them yourself.
Windows Key + Print Screen auto-saves. But Shift + Windows Key + S opens Snipping Tool, which captures and lets you manually decide what to do with the screenshot.
Using Snipping Tool instead of Windows + Print Screen gives you control over where screenshots save.
Open Snipping Tool (search for it in Start menu). Take your screenshot. When you’re done snipping, you get a preview. Click the save icon to save the screenshot.
Choose your save location and filename. Screenshots save exactly where you specify.
This method requires more manual effort but gives you complete control over where each screenshot goes.
Method 4: Change Through Registry (Advanced)
For advanced users, modifying the registry allows changing the default screenshot folder location.
Press Windows Key + R. Type regedit. Press Enter to open Registry Editor.
Navigate to: HKEY_CURRENT_USER\Software\Microsoft\Windows\CurrentVersion\Explorer\User Shell Folders
Look for the entry named Screenshots. The current value shows the current screenshot folder path.
Right-click Screenshots and select “Modify.” Change the path to wherever you want screenshots saved.
For example, change from %USERPROFILE%\Pictures\Screenshots to D:\MyScreenshots or %USERPROFILE%\Documents\Screenshots.
Click OK. Close Registry Editor.
The next time you take a screenshot, it saves to the new location.
Warning: Modifying registry incorrectly can break Windows. Only do this if comfortable with registry editing. Back up registry first: File > Export before making changes.
Method 5: Use Third-Party Screenshot Tools
If Windows’s automatic screenshot saving doesn’t meet your needs, third-party tools offer more control.
Apps like ShareX, Greenshot, or Snagit let you:
- Specify default save location
- Automatically organize screenshots by date or custom folders
- Customize hotkeys
- Edit screenshots before saving
- Upload screenshots to cloud storage automatically
Download and install your preferred tool. Configure the default save location in settings.
Your Windows + Print Screen might still use Windows’s default behavior, but you can configure your third-party tool to use a different hotkey and different save location.
This method requires installing additional software but offers more flexibility than Windows’s built-in approach.
Method 6: Use OneDrive or Cloud Sync
If you want screenshots backed up automatically, sync them to cloud storage.
After changing the screenshot folder location to a OneDrive or Google Drive folder, screenshots automatically sync to cloud storage.
Navigate your new screenshot location to be inside your OneDrive sync folder. For example: C:\Users\[YourUsername]\OneDrive\Screenshots
(Replace OneDrive with your cloud storage service’s sync folder path.)
Screenshots now sync automatically to cloud storage. You can access them from any device.
This method combines screenshot organization with automatic backup and cross-device access.
Troubleshooting: Screenshots Still Saving in Old Location
If you changed the folder location but Windows still saves screenshots in the old Pictures > Screenshots location, something went wrong.
Check what happened:
After moving the folder, did Windows create a new empty Screenshots folder in Pictures? If yes, Windows doesn’t know about the move.
Fix it:
Delete the new empty Screenshots folder that Windows created in Pictures (or rename it so Windows doesn’t use it).
Use Method 2 (Properties > Location tab) to explicitly tell Windows where the screenshots are now.
Alternatively, use the Registry method to manually change the registry entry pointing to the correct new location.
When You Want Multiple Screenshot Locations
If you want different screenshots going to different folders based on context, Windows’s built-in approach doesn’t support this.
Solutions:
- Use Snipping Tool (Shift + Windows Key + S) and manually choose save location for each screenshot
- Use third-party tools that support multiple save locations based on rules
- Use different hotkeys for different tools saving to different locations
This requires more manual work but provides flexibility for complex organizational needs.
Preventing Screenshot Folder Disorganization
After changing the location to a better organized folder structure:
Use subfolders: Create subfolders within your Screenshots folder (Work, Personal, Gaming, etc.). Manually organize screenshots into appropriate folders.
Enable cloud sync: Auto-backup screenshots through OneDrive, Google Drive, or similar.
Archive old screenshots: Periodically move old screenshots to archive folders or external storage.
Set retention policies: Delete screenshots you don’t need. Don’t let them accumulate indefinitely.
Use descriptive filenames: When manually saving screenshots, use descriptive names so you can find them later.
Understanding Screenshot Folder Path Variables
If using Registry or advanced methods, understanding path variables helps create flexible paths:
%USERPROFILE%= Your user profile folder (C:\Users[YourUsername])%HOMEPATH%= Similar to USERPROFILE%APPDATA%= AppData folderD:\= Specific drive letters
You can use these variables to create paths that work regardless of username or drive configuration.
When Screenshots Don’t Save at All
If screenshots aren’t saving anywhere after changing locations, the new location might be inaccessible.
Common causes:
- New location doesn’t exist (you need to create the folder first)
- Permissions issue (you don’t have write access to the new location)
- Path is formatted incorrectly (registry method)
- External drive is disconnected (if you specified a removable drive)
Solutions:
- Create the destination folder manually before changing screenshot location
- Ensure you have write permissions to the new location
- Double-check path formatting (should be valid Windows path)
- Use a permanently connected drive, not removable devices
Changing Screenshot Settings for Multiple Users
If your computer has multiple user accounts, each account has its own Screenshots folder.
Each user can change their own screenshot location independently:
- Login as that user
- Change their screenshot location following methods above
- Each user’s screenshots save to their specified location
Administrator can change default locations for all users by modifying system registry (advanced), but users can always override with personal settings.
The Reality
Windows 11 makes it unnecessarily complicated to change where screenshots save. There’s no straightforward Settings option. You have to know about folder properties, registry editing, or other workarounds.
But once you know these methods, changing the location is actually simple. Most people just move the folder. That’s the easiest approach.
For complex organizational needs, third-party tools or cloud sync offers more control.
Your screenshot location should work for you, not against you. If the default location doesn’t work, change it to something better.
Disclaimer: This article provides guidance on changing Windows 11 screenshot folder location. Results vary by Windows version, user permissions, and folder configuration. Registry modifications require careful editing—incorrect changes can affect system functionality. Users assume responsibility for understanding their folder paths and ensuring destination locations exist and are accessible. Cloud sync integration requires appropriate service account and configuration. Seek technical support if screenshots fail to save after attempting these methods.

- Killer Network Service: Is It a Virus or Safe to Disable?

- How to Set Up Parental Controls on Windows 11: A Step-by-Step Guide

- How to Extract Audio From a Video: Easy Ways to Save Audio

- How to Set a Photo Album as Your Wallpaper on iPhone: Step-by-Step Guide

- How to Convert a Bootable USB Drive to an ISO File in Windows

Products
-
![Apple Watch Ultra 3 [GPS + Cellular 49mm] Running & Multisport Smartwatch w/Rugged Titanium Case w/Black Titanium Milanese Loop - M. Satellite Communications, Advanced Health & Fitness Tracking](https://bazaronweb.com/retailstores/wp-content/uploads/2025/09/apple-watch-320x320.jpg) Apple Watch Ultra 3 [GPS + Cellular 49mm] Running & Multisport Smartwatch w/Rugged Titanium Case w/Black Titanium Milanese Loop - M. Satellite Communications, Advanced Health & Fitness Tracking
Apple Watch Ultra 3 [GPS + Cellular 49mm] Running & Multisport Smartwatch w/Rugged Titanium Case w/Black Titanium Milanese Loop - M. Satellite Communications, Advanced Health & Fitness Tracking
-
 Apple iPad mini (A17 Pro): Apple Intelligence, 8.3-inch Liquid Retina Display, 256GB, Wi-Fi 6E, 12MP Front/12MP Back Camera, Touch ID, All-Day Battery Life — Purple
-
 Apple AirPods Max Wireless Over-Ear Headphones, Active Noise Cancelling, Transparency Mode, Personalized Spatial Audio, Dolby Atmos, Bluetooth Headphones for iPhone – Space Gray
-
 Apple AirPods Pro 2 Wireless Earbuds, Active Noise Cancellation, Hearing Aid Feature, Bluetooth Headphones, Transparency, Personalized Spatial Audio, High-Fidelity Sound, H2 Chip, USB-C Charging
-
Home Garage 210 TC Cotton King Floral Fitted (Elastic) Bedsheet(Pack of 1, Grey)
Original price was: ₹999.00.₹299.00Current price is: ₹299.00.
Leave a Reply