Discounted Products
-
 Home Garage 210 TC Cotton King Floral Fitted (Elastic) Bedsheet(Pack of 1, Grey)
Original price was: ₹999.00.₹299.00Current price is: ₹299.00.
Home Garage 210 TC Cotton King Floral Fitted (Elastic) Bedsheet(Pack of 1, Grey)
Original price was: ₹999.00.₹299.00Current price is: ₹299.00.
-
 Goodrik 140 TC Cotton Double 3D Printed Flat Bedsheet(Pack of 1, Brown)
Original price was: ₹499.00.₹229.00Current price is: ₹229.00.
Goodrik 140 TC Cotton Double 3D Printed Flat Bedsheet(Pack of 1, Brown)
Original price was: ₹499.00.₹229.00Current price is: ₹229.00.
-
 GLOBALSHOP 350 TC Microfiber Double Floral Flat Bedsheet(Pack of 1, Multicolor)
Original price was: ₹1,250.00.₹263.00Current price is: ₹263.00.
GLOBALSHOP 350 TC Microfiber Double Floral Flat Bedsheet(Pack of 1, Multicolor)
Original price was: ₹1,250.00.₹263.00Current price is: ₹263.00.
-
 RisingStar 250 TC Microfiber King Printed Fitted (Elastic) Bedsheet(Pack of 1, FITTED-ROUND-CIRCLES-PREMIUM)
Original price was: ₹2,299.00.₹299.00Current price is: ₹299.00.
RisingStar 250 TC Microfiber King Printed Fitted (Elastic) Bedsheet(Pack of 1, FITTED-ROUND-CIRCLES-PREMIUM)
Original price was: ₹2,299.00.₹299.00Current price is: ₹299.00.
-
 Home Garage 210 TC Cotton King Floral Fitted (Elastic) Bedsheet(Pack of 1, Fitted Black Green)
Original price was: ₹1,299.00.₹299.00Current price is: ₹299.00.
Home Garage 210 TC Cotton King Floral Fitted (Elastic) Bedsheet(Pack of 1, Fitted Black Green)
Original price was: ₹1,299.00.₹299.00Current price is: ₹299.00.
-
 Home Garage 180 TC Cotton King 3D Printed Flat Bedsheet(Pack of 1, White)
Original price was: ₹999.00.₹229.00Current price is: ₹229.00.
Home Garage 180 TC Cotton King 3D Printed Flat Bedsheet(Pack of 1, White)
Original price was: ₹999.00.₹229.00Current price is: ₹229.00.
-
 Panipat Textile Hub 152.4 cm (5 ft) Polyester Window Curtain (Pack Of 2)(Solid, Aqua)
Original price was: ₹1,899.00.₹299.00Current price is: ₹299.00.
Panipat Textile Hub 152.4 cm (5 ft) Polyester Window Curtain (Pack Of 2)(Solid, Aqua)
Original price was: ₹1,899.00.₹299.00Current price is: ₹299.00.
-
 Home Sizzler 214 cm (7 ft) Polyester Semi Transparent Door Curtain (Pack Of 2)(Floral, Maroon)
Original price was: ₹1,199.00.₹399.00Current price is: ₹399.00.
Home Sizzler 214 cm (7 ft) Polyester Semi Transparent Door Curtain (Pack Of 2)(Floral, Maroon)
Original price was: ₹1,199.00.₹399.00Current price is: ₹399.00.
-
 Home Sizzler 153 cm (5 ft) Polyester Room Darkening Window Curtain (Pack Of 2)(Floral, Brown)
Original price was: ₹799.00.₹299.00Current price is: ₹299.00.
Home Sizzler 153 cm (5 ft) Polyester Room Darkening Window Curtain (Pack Of 2)(Floral, Brown)
Original price was: ₹799.00.₹299.00Current price is: ₹299.00.
-
 Stella Creations 214 cm (7 ft) Polyester Room Darkening Door Curtain (Pack Of 2)(Abstract, Brown)
Original price was: ₹1,299.00.₹449.00Current price is: ₹449.00.
Stella Creations 214 cm (7 ft) Polyester Room Darkening Door Curtain (Pack Of 2)(Abstract, Brown)
Original price was: ₹1,299.00.₹449.00Current price is: ₹449.00.
-
 Homefab India 152.5 cm (5 ft) Polyester Room Darkening Window Curtain (Pack Of 2)(Floral, Light Blue)
Original price was: ₹1,199.00.₹319.00Current price is: ₹319.00.
Homefab India 152.5 cm (5 ft) Polyester Room Darkening Window Curtain (Pack Of 2)(Floral, Light Blue)
Original price was: ₹1,199.00.₹319.00Current price is: ₹319.00.
-
 Urban Home 214 cm (7 ft) PVC Transparent Door Curtain Single Curtain(Solid, Off White)
Original price was: ₹699.00.₹203.00Current price is: ₹203.00.
Urban Home 214 cm (7 ft) PVC Transparent Door Curtain Single Curtain(Solid, Off White)
Original price was: ₹699.00.₹203.00Current price is: ₹203.00.
-
 Panipat Textile Hub 213 cm (7 ft) Polyester Door Curtain (Pack Of 2)(Solid, Brown)
Original price was: ₹1,199.00.₹349.00Current price is: ₹349.00.
Panipat Textile Hub 213 cm (7 ft) Polyester Door Curtain (Pack Of 2)(Solid, Brown)
Original price was: ₹1,199.00.₹349.00Current price is: ₹349.00.
-
 Home Sizzler 214 cm (7 ft) Polyester Semi Transparent Door Curtain (Pack Of 2)(Floral, Brown)
Original price was: ₹999.00.₹349.00Current price is: ₹349.00.
Home Sizzler 214 cm (7 ft) Polyester Semi Transparent Door Curtain (Pack Of 2)(Floral, Brown)
Original price was: ₹999.00.₹349.00Current price is: ₹349.00.
-
 Panipat Textile Hub 213 cm (7 ft) Polyester Semi Transparent Door Curtain (Pack Of 2)(Floral, Brown)
Original price was: ₹899.00.₹299.00Current price is: ₹299.00.
Panipat Textile Hub 213 cm (7 ft) Polyester Semi Transparent Door Curtain (Pack Of 2)(Floral, Brown)
Original price was: ₹899.00.₹299.00Current price is: ₹299.00.
Sometimes, Windows refuses to delete a file even when you are sure you no longer need it. You may see messages such as “The action can’t be completed because the file is open in another program,” “Access is denied,” or “You need permission to perform this action.” These errors can be frustrating, especially when the file appears to be doing nothing in the background.
In many cases, restarting Windows or closing the application using the file solves the problem. However, there are situations where a file remains locked because of a background process, incorrect permissions, a system component, or another application that has not released the file properly.
One useful way to deal with stubborn files is through Command Prompt. Windows includes several command-line tools that can help you take ownership of a file, change its permissions, and remove it. The process may look complicated at first, but you can follow it step by step.
In this guide, I’ll explain how to delete locked files in Windows using Command Prompt, what to do when you receive an “Access is denied” message, and a few precautions you should take before forcing a file deletion.
Why Does Windows Say a File Is Locked?
Before forcing a file to be deleted, it helps to understand why Windows is preventing the action.
The most common reason is that another application is currently using the file. For example, a document may still be open in Microsoft Word, an image may be open in an editing application, or a video may be playing in a media player.
Sometimes, however, the application appears to be closed while its background process is still running. Windows Explorer, antivirus software, backup programs, synchronization services, and other utilities can also temporarily access files.
You may also encounter the problem because your Windows account does not have sufficient permissions. This is particularly common with files inside system folders or folders belonging to another user.
Another possibility is that the file or folder has unusual permissions or ownership settings. In those situations, Command Prompt can be useful because it gives you direct access to Windows file-management commands.
Things to Check Before Deleting a Locked File
Before using commands to force deletion, make sure the file is actually safe to remove.
First, check its name and location. If it is inside your Downloads, Documents, Desktop, or another personal folder, it is more likely to be something you created or downloaded.
Be more careful with files located inside folders such as:
- C:\Windows
- C:\Program Files
- C:\Program Files (x86)
- C:\ProgramData
- C:\Users\YourName\AppData
Deleting important system or application files can cause programs or Windows itself to stop working correctly.
You should also close applications that may be using the file. If possible, save your work and exit the relevant programs before continuing.
If you are unsure about a particular file, don’t force-delete it simply because Windows reports that it is locked.
Step 1: Find the Full File Path
The first thing you need is the exact location of the file.
Open File Explorer and navigate to the file you want to remove. You can hold the Shift key while right-clicking the file and use the option to copy its path, depending on your Windows configuration.
You can also open the file’s Properties window and look at its location.
For example, suppose the file is:
C:\Users\Jessica\Downloads\old-file.zip
The complete path is important because Command Prompt needs to know exactly which file you want to delete.
If the filename contains spaces, you should place the complete path inside quotation marks when using the command.
For example:
"C:\Users\Jessica\Downloads\old file.zip"
This prevents Command Prompt from interpreting the spaces as separate commands or arguments.
Step 2: Open Command Prompt as Administrator
The next step is to open Command Prompt with administrator privileges.
Press the Windows key and type:
Command Prompt
Right-click Command Prompt in the search results and select Run as administrator.
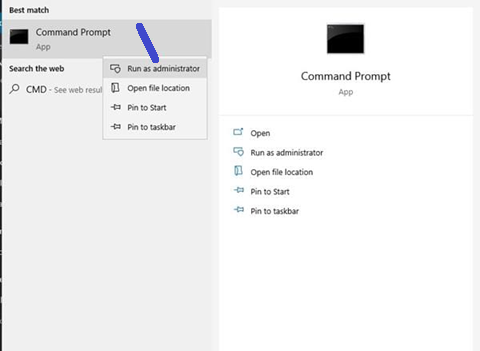
Windows may display a User Account Control prompt asking whether you want to allow the application to make changes to your device.
Click Yes if you are comfortable proceeding.
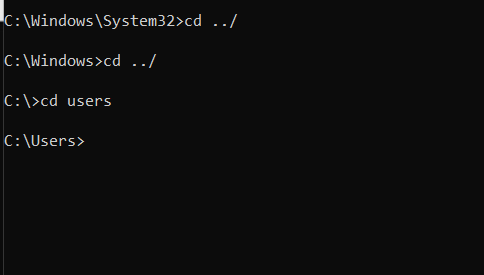
An elevated Command Prompt window should now open.
You will usually see something similar to:
C:\Windows\System32>
This indicates that Command Prompt is running with administrative privileges.
Administrator access is important because some locked files cannot be modified or deleted by a standard user account.
Step 3: Take Ownership of the File
If Windows reports that you do not have permission to delete the file, you may need to take ownership of it first.
Windows provides the takeown command for this purpose.
The basic syntax is:
takeown /f "full-file-path"
For example:
takeown /f "C:\Users\Jessica\Downloads\old-file.zip"
Press Enter after entering the command.
If the command succeeds, Windows should report that you now have ownership of the file.
Taking ownership does not delete the file. It simply changes who is considered the owner, which can allow you to manage a file that was previously controlled by another account or permission configuration.
This step is particularly useful when you receive an “Access is denied” message.
Step 4: Grant Yourself Permission
After taking ownership, you may still need to modify the file’s permissions.
The icacls command can be used to change access permissions.
For example:
icacls "C:\Users\Jessica\Downloads\old-file.zip" /grant %username%:F
Here, /grant adds permissions for your account, while F represents full access.
After entering the command, press Enter.
Windows should display a message indicating whether the operation completed successfully.
This step can help when a file belongs to another user or has restrictive permissions.
However, be careful when using permission-changing commands on Windows system files. Granting yourself full control over important system files is usually unnecessary and can create security or stability problems.
Step 5: Delete the File Using the DEL Command
Once you have the required permissions, you can use the del command to delete the file.
The basic command is:
del "full-file-path"
For example:
del "C:\Users\Jessica\Downloads\old-file.zip"
Press Enter.
If the file is no longer locked and your account has sufficient permissions, Windows should remove it.
You can then open File Explorer and check whether the file has disappeared.
Remember that deleting a file through Command Prompt can bypass the normal File Explorer experience. Depending on how the command is used, the file may not behave exactly like a normal deletion through the Recycle Bin.
For that reason, double-check the path before pressing Enter.
Step 6: Force the Deletion
Sometimes, Windows continues to refuse the deletion because of the file’s attributes.
You can use the /f option with the del command to force deletion of read-only files.
For example:
del /f "C:\Users\Jessica\Downloads\old-file.zip"
The /f option tells Windows to force deletion of read-only files.
You can also use /a to target files based on their attributes.
However, remember that these options do not magically unlock a file that is actively being used by another application. If a running process has an open handle to the file, you may still receive an error.
In that situation, you need to identify and close the application or process using the file.
What If Command Prompt Still Cannot Delete the File?
If you still cannot delete the file, don’t immediately keep adding more forceful commands.
First, restart the application that may be using the file. If that does not work, restart Windows.
After restarting, try deleting the file normally.
You can also boot Windows into Safe Mode if a background application is repeatedly locking the file. Safe Mode starts Windows with a limited set of drivers and services, which can make it easier to identify whether a third-party program is responsible.
Another useful approach is checking Task Manager.
Press Ctrl + Shift + Esc to open Task Manager and look for applications that may be associated with the locked file. Close the relevant application if you recognize it.
Do not terminate random Windows processes simply because they appear unfamiliar.
Using Command Prompt for Locked Folders
The same general approach can be used for folders, but you need to use commands carefully.
The rmdir command can remove directories.
For example:
rmdir /s /q "C:\Users\Jessica\Downloads\Old Folder"
The /s option removes the directory and its contents, while /q suppresses confirmation prompts.
This makes the command powerful—and potentially dangerous.
Before running it, verify the entire folder path carefully. A typo in the path could cause you to delete the wrong folder and its contents.
For important folders, I recommend removing files individually rather than immediately using /s /q.
Common Errors and What They Mean
“Access is denied”
This generally indicates that your account does not have the required permissions or that another security restriction is preventing the operation.
Running Command Prompt as administrator, taking ownership, and correcting permissions may help.
“The process cannot access the file”
This usually means another application or process currently has the file open.
Close the application using the file and try again.
“Could Not Find This File”
Check the path and filename carefully. The file may have already been removed, renamed, or moved.
“The filename, directory name, or volume label syntax is incorrect”
This can happen when a path has been entered incorrectly. Quotation marks are particularly important when the path contains spaces.
Is It Safe to Force Delete Locked Files?
It depends entirely on which file you are deleting.
Removing an old downloaded ZIP file is very different from deleting a DLL inside the Windows folder.
If the file belongs to an application, deleting it could cause that application to stop working. If it is a Windows system file, forced deletion could cause much more serious problems.
For that reason, I recommend using Command Prompt only when you understand what the file is and why you want to remove it.
If you only want to free up disk space, Windows provides safer tools such as Storage settings and Disk Cleanup. You should use those options instead of manually deleting unfamiliar system files.
Final Thoughts
Locked files can be frustrating, especially when Windows refuses to remove something that you no longer need. Fortunately, Command Prompt provides several tools that can help when the normal deletion process doesn’t work.
The general process is straightforward: identify the correct file path, open Command Prompt as administrator, take ownership if necessary, adjust permissions when appropriate, and use the del command to remove the file.
The important part is knowing when to stop. If a file is actively being used by Windows or an application, forcing its deletion may create problems. In many cases, closing the relevant application or restarting the computer is the safer solution.
If you are confident that the file is unnecessary and understand what it belongs to, Command Prompt can be a useful way to regain control over stubborn files without installing additional software.
Disclaimer
The information provided in this article is intended for general educational and informational purposes only. Command Prompt commands can make significant changes to files, folders, permissions, and other Windows components.
Always verify the file path and filename before executing a deletion command. Do not delete Windows system files, application files, or other important data unless you are certain that they are safe to remove. The author and publisher are not responsible for data loss, system instability, application errors, or other problems resulting from the use or misuse of the commands described in this article.
Create a backup of important files before making significant changes to your Windows installation.

- How to Remotely Control Another Computer Using Windows Quick Assist

- 5 Must-Have Electronics Gadgets for a More Comfortable Living Room

- How to Create a Windows 11 System Backup on an External Hard Drive

- 10 Smart Home Ideas That Make Everyday Life Easier

- Gemini Live Avatar: How to Talk to Gemini Face-to-Face

Products
-
![Apple Watch Ultra 3 [GPS + Cellular 49mm] Running & Multisport Smartwatch w/Rugged Titanium Case w/Black Titanium Milanese Loop - M. Satellite Communications, Advanced Health & Fitness Tracking](https://bazaronweb.com/retailstores/wp-content/uploads/2025/09/apple-watch-320x320.jpg) Apple Watch Ultra 3 [GPS + Cellular 49mm] Running & Multisport Smartwatch w/Rugged Titanium Case w/Black Titanium Milanese Loop - M. Satellite Communications, Advanced Health & Fitness Tracking
Apple Watch Ultra 3 [GPS + Cellular 49mm] Running & Multisport Smartwatch w/Rugged Titanium Case w/Black Titanium Milanese Loop - M. Satellite Communications, Advanced Health & Fitness Tracking
-
 Apple iPad mini (A17 Pro): Apple Intelligence, 8.3-inch Liquid Retina Display, 256GB, Wi-Fi 6E, 12MP Front/12MP Back Camera, Touch ID, All-Day Battery Life — Purple
-
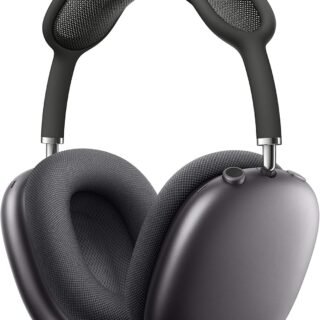 Apple AirPods Max Wireless Over-Ear Headphones, Active Noise Cancelling, Transparency Mode, Personalized Spatial Audio, Dolby Atmos, Bluetooth Headphones for iPhone – Space Gray
-
 Apple AirPods Pro 2 Wireless Earbuds, Active Noise Cancellation, Hearing Aid Feature, Bluetooth Headphones, Transparency, Personalized Spatial Audio, High-Fidelity Sound, H2 Chip, USB-C Charging
-
Home Garage 210 TC Cotton King Floral Fitted (Elastic) Bedsheet(Pack of 1, Grey)
Original price was: ₹999.00.₹299.00Current price is: ₹299.00.
Leave a Reply